A4 Picking
This program is used to carry out order picking. It consists of the following levels:
- A4.1 Picking list overview
- A4.2 Position overview
- A4.3 Position processing
- A4.4 Return-Storage Support
Depending on whether the quantities on the SU correspond to the picking quantities, either the standard process or the alternative process is used. If the SU quantities do not correspond to the picking quantities, please proceed according to the standard process. If the picking quantities correspond exactly to the SU quantities, you can also use the faster alternative process.
The standard picking process runs as follows:
- The picker selects an order via the picking list overview.
- The picker scans Blanco Barcode in A4.2 item overview and creates a new PTU that can be used for picking. Alternatively, he selects an existing PTU or scans an empty reusable carrier, which is automatically converted into a PTU (see note below).
- Picker moves to the first storage place with the load carrier into which he wants to pick.
- If not already done, the picker selects the first item and validates whether he is picking from the correct pallet by scanning the SU barcode on A4.3 item processing.
- The picker then confirms the quantity picked on A4.3 Position processing or enters a partial quantity.
- Steps 3-5 are repeated until picking is complete. Now the picker enters the dimensions, weights and inventory measure via the menu
Alternative process:
If the quantity on SU corresponds to the picking quantity of a picking item, the SU can be converted into a PTU/SSCC with a 2nd scan. This shortens the process, as no Blanco Barcode has to be scanned and attached to the LT.
- The picker selects an order via the picking list overview.
- The picker selects an item in A4.2 Item overview and goes directly to A4.3 Item processing.
- Now the picker scans the SU and thus validates that he is picking the correct pallet. As the picking quantity matches the current SU quantity 1:1, the correct quantity is suggested directly.
- The picker confirms the quantity after a check.
- Since the quantity on the SU corresponds to the picking quantity of the picking position, it can now be converted into a PTU with a second scan. This automatically generates a move order to the next best Consolidation Storage Place (from packaging, from picking team or last used Consolidation Storage Place)
- The picker then enters the dimensions, weights and inventory measure via the menu. Once this is finished, a SSCC is created.
- Steps 2-5 are repeated until picking is complete.
Hinweis
In picking, only PTUs or SSCCs can be used as target containers. If a reusable empty storage unit (SU) is scanned where the Chg. Load Carrier Type allowed flag is set, it is automatically converted into a PTU and can be used directly for picking.
Menus:
In A4 there are menus A and B.
A:
- New PTU: Creates a new PTU with the selected position. Also prints a new PTU label. This is useful if only one load carrier with one position is to be generated. If the function is grayed out, the setup Create PTU/SSCC via hotkey A4, A5 is disabled in the SIEVERS WMS Team Card.
- Dimensions and weights
- Assign/Unload TU: Depending on whether or not you have created or selected a PTU/SSCC, you can use this function to either place the load carrier in a transfer location or pick up a load carrier in order to pick into it. If a single PTU is to be unloaded, a Consolidation storage place is suggested. If there is a consolidation storage place in the picking team, it is used. If there is none, a place is determined via the move job action Determination of Packaging Consolidation Storage Place for PTUs. In A4.2, you can also start this function by directly scanning a PTU or SSCC.
- Order/pos - info
- Information
- [Transfer](#a3-item transfer)
- Internal transports
- Print PTU/SSCC label
B:
- Stock difference
- Photo: Here you can take photos of the picked items which will be stored on the picking document in the details section.
- New picking place (F7 / Z): Searches for a new picking place. If the current inventory is not yet blocked, the system first asks whether it should be blocked. For serial number picking, all open inventories of the picking position are blocked and a replacement inventory is searched for each.
- SU label
- Help
- Keyboard
- SSCC Info
- Return-Storage Support: Performs return-storage of remaining quantities if negative picking was carried out
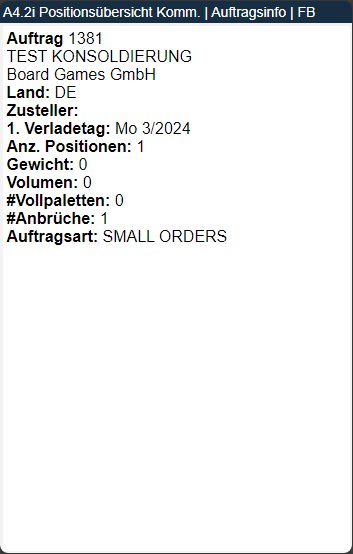
A4.Xi Order info
Shows an information overview of the selected picking order. This page can be accessed from all A4 pages via the menu or F3.
- Order no.
- Customer/vendor name
- Country
- Shipping agent
- 1st loading day
- Number of Positions
- Weight
- Volume: Calculated from the item master data.
- Number of Full Load Carrier Picks
- Number of Partial Picks
- Order Type
A4.1 Picking list overview
All orders that have been released and are therefore available for picking can be viewed on the picking list overview. The pickers can use this overview to select an order to pick. Multiple users can select a picking document at the same time. The users will be displayed separated by commas.
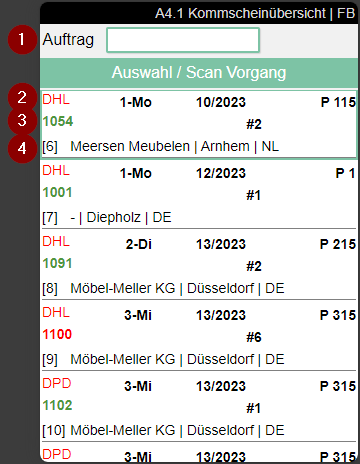
1: An order number can be entered here
2: Left: Shipping Agent Code | Center: First loading day and loading week from Warehouse Shipment Planning | Right: Priority
3: Order number (Green or Red) | Middle: Number of Positions | Right: Employee Marking
4: Left: Order line | Center: Customer name, city and country code | With MOP or SOP: Comment text from MOP or SOP Monitor
Hinweis
The color of the order number depends on whether it is a partial delivery or not. Green = no partial delivery, red = partial delivery.
If a i is seen in a document, there is additional information that can be accessed via F3. For MOP and SOP orders, this comment text originates from the respective monitor.
Hinweis
Please note that the shipping agent and customer information is omitted for a picking series and the picking series number is shown instead. In addition, the number of pieces picked so far and the total number of pieces in the series are shown.
A4.2 Position overview
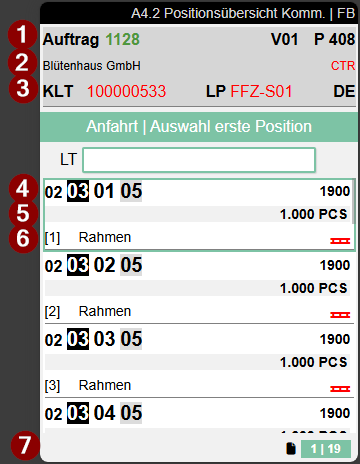
The picking item overview can be used to estimate the scope of an order. From here, the picker can also influence the picking route himself.
- Left: Order number (red or green) or various order number or MOP batch number | Center: Packaging team | Right: Priority/Sort number of the order
- Left: Customer name | Right: Shipping agent | With MOP: Comment text from MOP Monitor
- Left: Load carrier type and no. or GS1 SSCC no. | Center: Current location of the load carrier, in this case a floor conveyor vehicle | Right: Ship-to Country
- Left: The storage place from which the items are to be picked | Right: Item no.
- Left: Lot no. and/or sell-by date | Right: Quantity to be picked (for various orders, totaled quantity per picking team)
- Left: Item description and Variant Code | Right: One of the following symbols may appear here:
 Red full pallet: The quantity on the load carrier exactly matches the required quantity. The entire load carrier is withdrawn.
 Green pallet with minus (negative picking): The required quantity exceeds the configured negative picking threshold. The entire storage unit is withdrawn and the remaining quantity is returned in A4.4 Return-Storage Support.
- Shows the current workload. Left number: Number of open orders | Right number: Number of open positions
Hinweis
The color of the order number depends on whether it is a partial delivery or not. Green = no partial delivery, red = partial delivery.
If a i is seen in a document, there is additional information that can be accessed via F3. For MOP orders, this note text originates from the MOP Monitor.
Further functions and links can be viewed on the Zebra MC33 via the menu under P1.
To continue the picking process from here, a picked load carrier (PTU) or a shipping unit number (SSCC) is required. Scan a new Blanco Barcode or an existing PTU/SSCC that belongs to the same warehouse shipment. The system then automatically starts the function Unload PTU/SSCC, so that you can put down the load carrier at a transfer location or Consolidation Storage Place. Alternatively, you can still access the function via the menu (F8).
Hinweis
You can also pick into PTUs that are already in packaging according to the state. However, this is only possible as long as nothing has been packaged yet. If you decide to continue picking, the PTU is removed from the packaging process.
Hinweis
Please note that the shipping agent and customer information is omitted for a picking series and the picking series number is shown instead. In addition, the number of pieces picked so far and the total number of pieces in the series are shown.
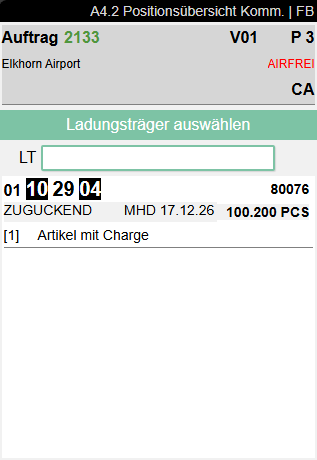
A4.3 Position Processing
The item processing page is used to validate and confirm picking. Employees can also block conspicuous inventories (e.g. too low). You can find out more about this below the process description.
Depending on whether a subpackaging unit is stored in the inventory, one of two different views is shown. The regular variant, without SPU, is this one:
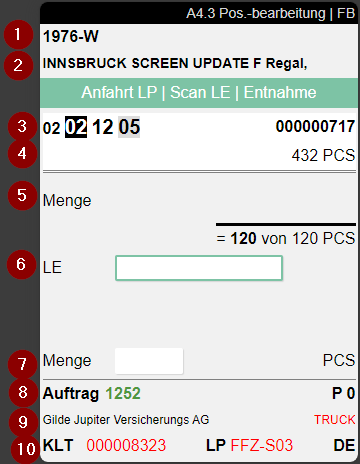
Fields:
- Item no.
- Item description
- Left: Storage place | Right: SU no. or GS1 SSCC no.
- Left: Lot no. and sell-by date | Right: Expected inventory in SU
- Quantity still to be picked of the total quantity to be picked
- Enter SU number
- Quantity. One of the following symbols may also appear here:
- Red full pallet: Complete withdrawal of the storage unit.
- Green pallet with minus (negative picking): Negative picking active. After confirmation, A4.4 Return-Storage Support opens.
- Left: Order no. | Centre: Packaging team | Right: Priority
- Left: Customers | Right: Shipping agent
- Left: Load Carrier no. | Centre: Current Location Code | Right: Country code
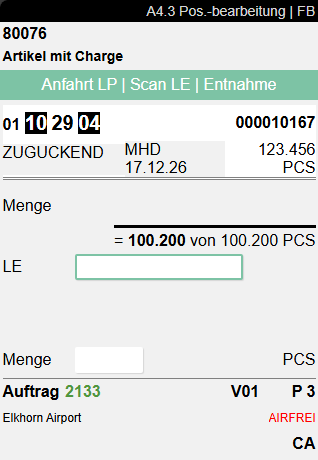
If an SPU is stored in the inventory, A4.3 looks like this:
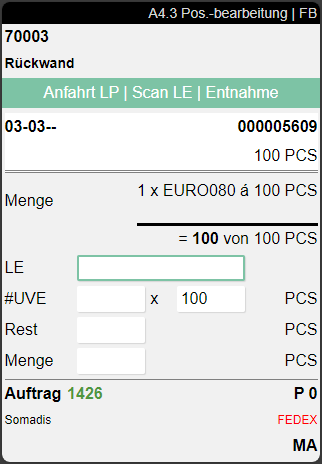
In this view, the quantity is divided into SPUs and individual pieces so that it is clear to the picker how many SPUs he should pick. In addition, the #SPU and Left fields can be used to influence the distribution.
The focus control automatically adapts to the demand quantity to avoid unnecessary input steps:
- Demand quantity > SPU quantity: The focus is initially on #SPU. After input, the cursor automatically jumps to Left, as a remaining quantity is likely required.
- Demand quantity = SPU quantity: The focus is on #SPU. After input, the cursor jumps to Quantity.
- Demand quantity < SPU quantity: The focus is directly on Quantity, as no complete SPU is being taken out.
If the storage place and inventory number are coloured red, the inventory is blocked.
If a i is seen in a document, there is additional information that can be accessed via F3.
Special features and operating modes in this screen:
- Serial Number Picking
- Negative Picking and Full Pallet Withdrawal
- Picking from Storage Places Without Load Carrier
- Further Notes and Integrations
Hinweis
If the Show Item Pictures in Picking option is enabled in the SIEVERS WMS Setup and an image is stored for the item, it is displayed in A4.3 instead of the Quantity label. Clicking the image opens an enlarged view. Press ESC to return to position processing. If no image is stored, the area remains empty.
Hinweis
Please note that the shipping agent and customer information is omitted for a picking series and the picking series number is shown instead. In addition, the number of pieces picked so far and the total number of pieces in the series are shown.
The same applies to orders that are part of a various order handling. In this case, DIV + picking document no. is shown instead of the order number and the total number of items per picking team/consolidation number, load carrier and item. In addition, the lowest priority of all included orders is shown.
Process:
- Go to the storage place displayed and check the storage unit barcode by scanning the SU label in the SU field highlighted in blue in the screenshot.
- At the top in the feedback area, you will now see the quantity that you need to pick. For SPU-managed items, the focus automatically jumps to the appropriate quantity field. Count and enter the picking quantity in the Quantity field or scan a GTIN barcode to reduce the displayed quantity by the quantity contained in the SPU. As soon as you confirm the Left field, the quantity is automatically filled in. If you have entered a Quantity Suggestion Mobile in the team properties, the quantity is automatically suggested.
- Then press the enter keys to confirm the picking. The system then assigns the picked quantity to the selected PTU. If you have confirmed a partial quantity, the first line of the Outbound Stock Post is always served.
Hinweis
If the Revalidation on Partial Pick field in the team properties is deactivated (default), the employee stays directly in the quantity dialog after a partial pick. The system automatically simulates the SU/inventory/storage place scan for the next picking line, provided it is from the same storage place. If the setting is activated, the SU, inventory, or storage place must be re-scanned or re-validated after each partial pick.
Hinweis
You can also scan a Blanco Barcode for a new PTU in the SU field. This is then automatically used as the active PTU to be picked into.
Hinweis
If inventory swaps are allowed in the WMS Setup, the appropriate quantity will not be shown in the feedback area until the inventory has been scanned.
A4.3 Serial Number Picking
For serial-number-tracked items (item tracking code with Serial No. Necessary = Yes), A4.3 shows a different view: instead of the regular quantity fields, a scrollable list of all outbound stock post lines for the position is displayed – one line per piece with the corresponding serial number.
- At the top is the input field for the load carrier or serial number (SN).
- Scanning a serial number or load carrier barcode marks the corresponding line as picked. The work indicator (remaining / total quantity to pick) is refreshed after each scan.
- A row in the list can be highlighted; the arrow keys allow navigation to review the processing status.
- The picker must first select or create a PTU (bottom left) before scanning can begin.
Partial picking:
When picking from a load unit (partial picking), the Inventory Swap in Load Carrier setting in the SIEVERS WMS Setup controls whether the picker may take any serial number from the load unit:
- Allowed: The system automatically swaps reservations within the load carrier. The picker takes the nearest piece and scans either the load carrier or the serial number for confirmation.
- Not allowed: The picker must locate the reserved serial number in the load unit and scan it exactly.
If a specific serial number is specified in the source document (e.g. sales order), that serial number must be taken; a swap is not possible.
Shortage report (F7 / Z):
A shortage report can be triggered via F7 / Z (menu B3 New picking place): the system blocks all open inventories of the current picking position and searches for a replacement for each. If the serial number is reserved in the source document, only an inventory with the same serial number is searched; otherwise any suitable replacement inventory is found. This requires Inventory swap in a load carrier to be activated in the SIEVERS WMS Setup.
A4.3 Negative Picking and Full Pallet Withdrawal
Negative picking:
For positions with negative picking, the full inventory unit quantity is always suggested as the withdrawal quantity, regardless of the team settings. The hint text in the upper area of the screen depends on the current processing step: Scan SU | Pick entire SU before the storage unit has been scanned, and Pick entire SU after the scan. The picker must take out the entire storage unit for the negative picking process and return-storage support to be triggered correctly.
Full pallet withdrawal with serial-number-tracked items:
For positions with full pallet withdrawal and serial-number-tracked items, A4.3 displays a neutral barcode symbol at the scan field instead of the label "SU / SN". The instruction reads Approach storage place | Scan SU to convert. The picker scans the entire storage unit to trigger conversion into a PTU or SSCC; identical to regular full-pallet positions. Alternatively, the conversion can be triggered directly from A4.2 by scanning the full pallet there.
A4.3 Picking from Storage Places Without Load Carrier
When the inventory to be picked is located on a storage place with the Storage without storage unit flag, the picking flow in A4.3 changes:
- The instruction reads: Approach SP | Scan SP | Pick
- Instead of the storage unit, the storage place is scanned to validate the pick.
- If the Storage without storage unit flag is not set on the storage place and no SU is present, the error message SU for validation missing appears.
A4.3 Further Notes and Integrations
Hinweis
Please note that the Quantity Suggestions Mobile from the SIEVERS WMS team also apply here.
Hinweis
If a shortage is found in a picking series, the system blocks the remaining stock of this inventory and searches for an alternative inventory. If no alternative inventory is found, the series is blocked and assigned the state Clarification.
Hinweis
If a ProGlove MAI (Mark Assistant Interface) is paired with the MDE, the key information from position processing (storage place, load unit, item, PTU and quantity) is shown simultaneously on the MAI display. The picker can confirm quantities and scan load units directly on the MAI without removing the MDE from the holster. The SCAN SU field indicates the validation status of the storage unit: as long as the SU has not yet been scanned, the field appears in yellow as a warning and the Confirm button is hidden. Once the SU has been successfully scanned, the field turns green and the Confirm button appears. For setup instructions, see ProGlove MAI Setup.
Hinweis
For items subject to quantity serialization (customer flag Activate Serialization Inventories in Warehouse Shipment = Yes and Serialization requirement for Inventory on the item or item category), A4.3 shows a dedicated screen for capturing serialization numbers per packaging unit instead of the regular quantity field. The picker first scans the storage unit for validation and then scans GS1 barcodes (application identifier 00 for SSCC or 21 for serial number). The captured serialization numbers are stored in the outbound stock posting lines and transferred to the posted documents after warehouse shipment posting. This screen does not appear for serial-number-tracked items (Serial No. Necessary = Yes) — those continue to use the regular serial number picking flow.
Blocking inventory:
It can happen that a inventory quantity is lower than expected during the pick and the pick cannot be carried out. In this case, the picker enters a 0 for the quantity and confirms this. The system then asks whether the inventory should be blocked. If you confirm with Yes, the system locks the inventory and searches for new inventory for picking, depending on the setup. Either via Inventory swap or via cancellation and re-release of the lines (see Pick. Optimization w. Inv. blocked in the Warehouse shipment section of the SIEVERS WMS Setup). The blocked inventory is documented with the Standard blocking code from the SIEVERS WMS setup and must be manually unblocked again via Business Central. The blocking and unblocking automatically affects all associated move job lines.
A4.4 Return-Storage Support
The A4.4 Return-Storage Support screen assists pickers with returning excess quantities after negative picking. When a full pallet withdrawal results in more goods on the load carrier than required for the order, a remaining quantity arises that must be rebooked to another storage unit. The return-storage support ensures that these remaining quantities are returned to available inventory in a controlled and efficient manner.
The screen is opened automatically after confirming the withdrawal quantity in A4.3 Position Processing, provided a negative picking situation applies.
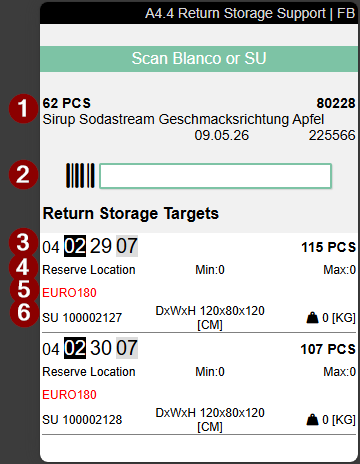
The header area displays the task instruction Scan Blanco or SU along with:
- Quantity and base unit, item no. and item description, as well as variant, lot no. (if applicable), sell-by date (if applicable)
- A scan field with barcode symbol for entering the target storage unit
Below the scan field there is the scrollable Return Storage Targets list. This shows suitable partial pallets near the withdrawal storage place that contain the same item and variant. The suggestions are sorted in ascending order by storage place.
- Left: Storage place | Right: Number of items present
- Left: Storage place type | Centre: Minimum inventory that should be maintained at this picking place for the item (replenishment lower threshold) | Right: Maximum inventory at this picking place (replenishment fill-to target). A value of 0 means no replenishment thresholds have been configured.
- Inventory measure code
- Left: Load carrier type and load carrier code | Centre: Depth × Width × Height | Right: Weight
Process:
- The negative picking is confirmed in A4.3 (pick entire storage unit).
- The A4.4 Return-Storage Support screen opens automatically.
- The picker sees the quantity to be returned and the list of return storage targets.
- The picker scans the storage unit onto which the remaining quantity should be placed. Accepted scan types are SU barcodes, GS1-SSCC barcodes and GS1 barcodes.
- The rebook is performed and the Ret. Storage Support open flag on the load carrier is reset.
Hinweis
Alternatively, the picker can scan a blanco barcode to create a new storage unit. In this case, the Weights and Measures screen is opened first to set up the new load carrier. The default inventory measure from the SIEVERS WMS Setup is pre-selected as the inventory measure.
Menu and functions:
The following functions are available in the A4.4 screen:
- Information (right arrow key): Opens A7.1 Item info without pre-selection
- Help (H): Opens the context-sensitive help
- Keyboard: Shows the virtual keyboard
Filter rules for the return storage targets:
Not all storage units are suitable as return-storage targets. The system filters the list according to the following criteria:
- Storage units (SU) only: PTU, STU and SSCC are not shown as return-storage options and cannot be scanned manually as targets. Warehouse inventory must not be mixed with order-related inventory.
- No blocked inventory: Storage units carrying blocked inventory are not offered as return-storage targets.
- Item and variant: Only storage units containing the same item and variant are suggested.
Handling of load carriers with other reservations:
If additional reservations from other orders exist on the storage unit being removed via negative picking, these are handled automatically: the affected released picking positions are cancelled and the quantities are bundled for re-release. This provides the opportunity to reunite previously split positions.
Cancellation and pending return-storage operations:
If the A4.4 screen is exited without completing the return-storage process, the remaining quantity stays on the forklift from an inventory perspective. The Ret. Storage Support open flag on the affected load carrier (in the load carrier card) is set to Yes. Additionally, the Ret. Storage Support Inv. field stores the inventory number of the affected inventory.
In this case, the picker is first guided to the next picking position (in A4.3) or to the placement of load carriers (in A4.2). After all load carriers of the picking document have been placed down, the A4.4 screen is displayed again for all load carriers with Ret. Storage Support open = Yes. The pending return-storage operations are processed one after another.
The picker cannot leave the picking document until all pending return-storage operations have been completed.
Hinweis
The return-storage support can also be called manually via menu item B8 in A4.2 Position overview or A4.3 Position Processing. This requires that at least one load carrier with pending return-storage support exists.
A4 MOP PTU LC Assignment
This page opens after you have selected a MOP batch in A4.2. Here the assignment of picked goods to load carriers and MOP boxes takes place.
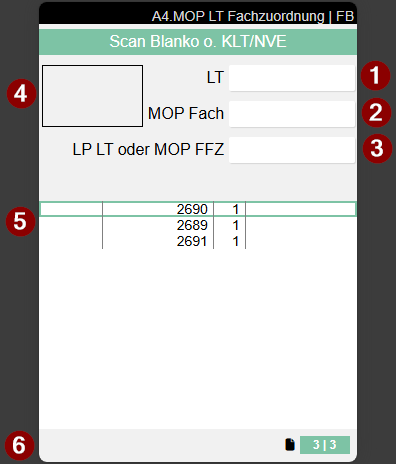
- Input load carrier, e.g., via blanco barcode
- Input MOP box
- Input storage place for load carrier or MOP rack
- Current MOP box. Remains empty when a new PTU is created for a new line or a new order. Shows the box number only after successful assignment
- Assignment table. Column 1: Box (empty here) | Column 2: Order number Green: All positions of the order are completely picked; Black: Order not yet started (no box number assigned); Normal display: Order in process (box number assigned) | Column 3: Number of positions | Column 4: Load carrier number with prefix. P = PTU; S = SSCC. The color of the load carrier shows the processing status: Black: PTU - no further attributes required, normal packaging follows; Green: SSCC with complete attributes, ready for shipment (inventory measures, dimensions and weight are maintained); Red: SSCC with missing attributes: inventory measures, dimensions (length/width/height) or weight are missing
- Work Indicator. Left number: Number of unfinished orders | Right number: Number of open picking positions | Colors: Green: There is something to do. Gray: There is nothing to do.
Process:
- You have already scanned or selected the first position in A4.2 and are therefore at the correct storage place with your forklift
- You must first create a new load carrier, as there is currently no assigned PTU. The cursor is automatically set to the order for which the PTU is needed. You have two options:
- Scan a blanco barcode in the LC field and attach it to your desired container
- Press F5 or select A1 New PTU in the menu to create a PTU without a blanco barcode. The PTU label will be printed automatically
- Then scan one of the boxes of your MOP rack in the MOP Box field.
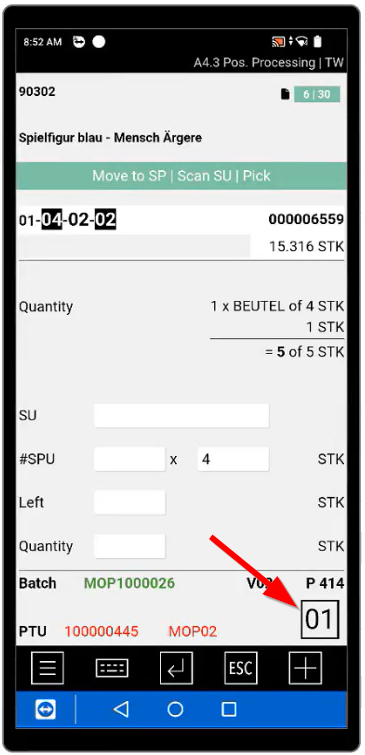
- Now A4.3 opens. Continue here with the standard process and enter a quantity. In the bottom right of the window you see a large number. This shows the box number into which the goods must be placed. For a new line, the box number is only displayed after assignment in A4 MOP.
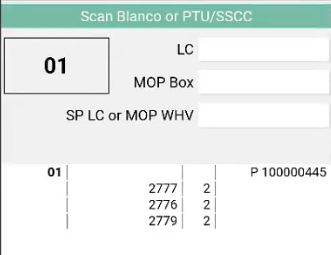
- The system then opens A4 MOP LC Box Assignment again. The focus is automatically on the MOP box field, so you can scan the box directly. In the assignment table there is a new line consisting of the box number in column 1 and the PTU number in column 4. You also now see the box number again in the top left corner, into which the goods must be placed. Since this process step is particularly error-prone, the box must be confirmed by scanning the box storage place code as soon as the goods have landed in it. Once this has happened, the new line with PTU and box number is assigned to the corresponding order. The current order is marked turquoise in the assignment table, making it immediately clear which order the box confirmation is being performed for.
- After confirming the box, the system automatically navigates to the next picking position:
- Position with assigned PTU: A4.3 opens directly with the next position. Confirm the quantity and then the box in A4 MOP.
- Position without assigned PTU (new order): A4 MOP opens with focus on the LC field. Create a new PTU, assign a box and pick the position in A4.3. If a box is full, you can also assign a new box after scanning a new PTU or a blanco barcode.
- If the source storage place was completely emptied by the pick and Zero Stocktaking Picking is active in the setup, the zero-count screen (B5.3) is automatically displayed before the next position. Confirm the empty storage place there before the process continues.
- This process repeats until all positions of the MOP batch have been processed. With ESC in A4.3 you reach the position overview A4.2 to orient yourself or to choose a deviating entry point.
- Optional: You can remove individual finished PTUs from the MOP rack during ongoing picking and bring them to packaging. As soon as a PTU is removed, its state automatically changes from 5-Picking Processing to 6-In Packaging Process. Packaging can thus work in parallel to picking.
- Once you have processed all lines, you must place the PTUs or the entire rack on a storage place or convert the PTUs to SSCCs.
- For direct conversion to an SSCC, select the load carrier in the table, open the Weights and Measures form via toolbar, menu or F1 and enter the desired inventory measure and weight. Once this is done, you can print an SSCC label via F9
- To place the entire rack at a storage place, scan the storage place in the SP LC or MOP WHV field. Please note that in this case the PTUs remain in the boxes in the system and only the rack itself is located at the new storage place. When putting down the rack, the state of all PTUs automatically changes from 5-Picking Processing to 6-In Packaging Process, so that packaging can already begin while the MOP batch is still running.
- To place individual PTUs, scan the PTU in the LC field and then the storage place in the SP LC or MOP WHV field
Now you can continue with A5 Packaging.