A2 Internal Transports
Internal transports can be used to move entire load carriers from A to B. One or more load carriers can be picked up and, depending on the setting, also set down simultaneously. It is irrelevant whether transport orders exist for the load carriers or not. If a move job is present when scanning a load carrier, it is automatically displayed. If no move job exists for the scanned load carrier, one is created and a target determination is automatically carried out. If a PTU is picked up whose order has a packing team with a consolidation storage place and the matching location stored, the correct consolidation storage place is automatically determined.
In the SIEVERS WMS setup, you can configure in the load carrier section that a follow-up move job is automatically generated for move jobs to receipt locations or transfer locations.
All movement data is stored in the SNCL Stock Entries and SNCL Load Carrier Entries.
When using A2, move jobs are automatically generated, employee markings are entered there, and the start and end time of the move job are stored.
The displayed move jobs are filtered to the selected team. Filters such as move job type or storage area are already taken into account when creating the move job for team selection.
A2.0 Internal Transports
The view of page A2.0 shows both the open move jobs and the currently picked up load carriers. This split view is suitable when only a few load carriers need to be moved. As soon as the quantity becomes larger, the views A2.1 Open move jobs and A2.2 Picked up load carriers should be used.
Buttons:
- P1: Open the program menu
- F4: Change the view on the Zebra MC33 to A2.1 Open move orders and A2.2 Recorded load carriers.
- F5: Open the Internal-movements-filter
Process:
- scan load carrier to pick it up
- scan target location to put the load carrier down
or
- scan of several load carriers to pick them up
- successive drop-off of load carriers by scanning the load carriers and their destination storage places one after the other
or
- scan several load carriers to pick them up
- placing all load carriers in one storage place at the same time
Hinweis
If you pick up a load carrier that does not yet have a destination storage place, one is automatically found and assigned.
Hinweis
When an SU (storage unit) is placed on a storage place with the Storage without storage unit flag, the storage unit is automatically dissolved and the contained inventories are posted directly to the target storage place. This applies to all storage place types - including transfer storage places, e.g. at a shelving area. Load carriers of types STU, PTU, and SSCC are retained and not dissolved.
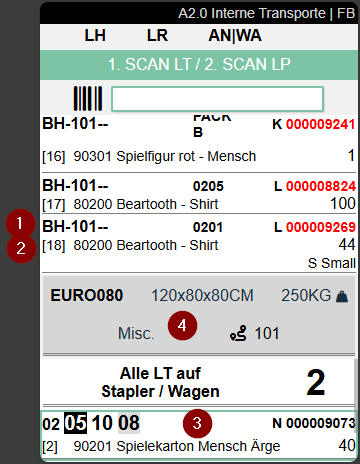
If you transport several load carriers at once, you will get this view on A2.0:
As you can see, All carriers on forklift / carts are now shown in the lower area. If you want to deliver the load carriers one after the other, simply scan them one after the other. If you want to deliver all load carriers at once, click on All carriers on forklift / cart. This screen will then be shown:
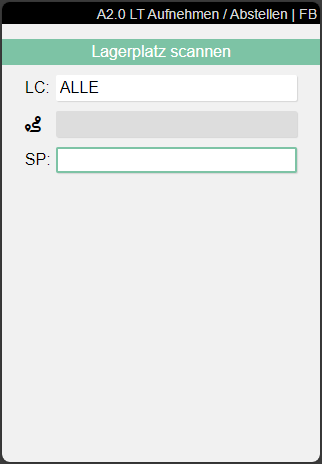
To place the load carriers, you must scan the new storage place. If the move order is of the type replenishment, you can also put to storage places where there is still remaining inventory of the item. If the target load carrier already contains one or more stock items with the same article, batch, variant and best-before date, a dialog appears asking whether the stock items should be consolidated. If you select Yes, all matching stock items are merged into a single stock item. If you select No, the load carrier is posted to the target storage place as usual.
Hinweis
If you want to scan and deliver several load carriers at once, you must specify the number of load carriers required on the forklift so that the option All load carriers on the forklift is shown. See screenshot below.

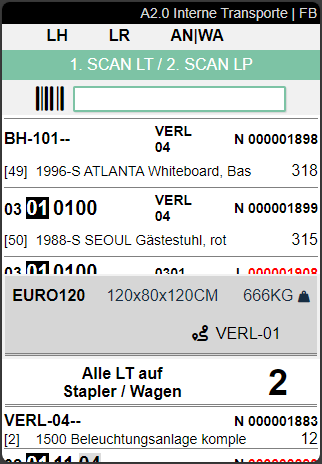
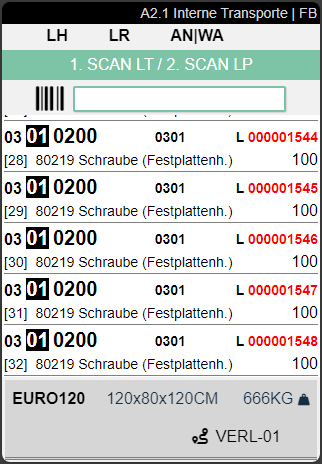
The next screenshot shows a split view with open transport jobs and currently picked up load carriers.
The screenshot above shows a split view with the open transport jobs and the load carriers currently picked up.
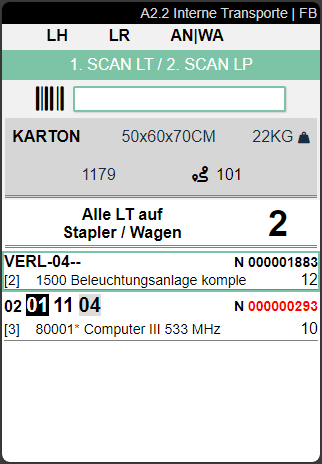
- Left: Destination storage places | Center: Storage area and shelf level | Right: Load carrier number or GS1-SSCC (red if Inventory measure code or dimensions are missing)
- Left: Item number and item description (if there are several items in the load carrier, the item number is marked with a red *) | Right: Quantity and if available item variant
- Currently selected load carrier
- If available, additional information on the current load carrier is shown in this gray area.
Top left: Inventory measure code | Top center: Dimensions | Top right: Weight |
Bottom left (if available): Source document number (see screenshot below) | Bottom center: The i shows that further information is available. Open this with the Menu. | Bottom right: Destination or departure point. Which location is shown depends on whether the employee has already picked up the load carrier:- Not yet collected: The destination is shown in the Additional information section
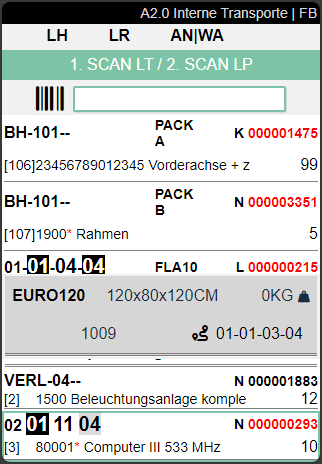
- Picked up: The additional information shows the departure location (see screenshot below)
In the example screenshot above, the additional information section shows the destination. The screenshot below shows the departure location.
Menu
You can access the menu via P1. This is the same on every A2 page.
It is divided into A and B.
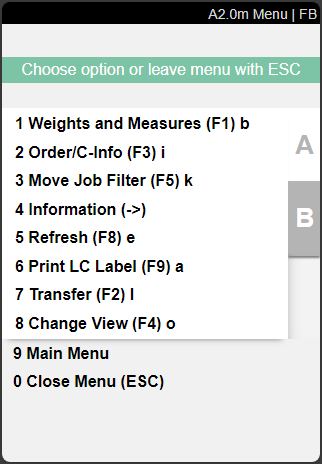
The following options are available here:
- Weights and Measures (F1) B
- Order/LC-Info (F3) i
- Move Job filter (F5) k
- Information (->)
- Refresh (F8) e
- Print LC label (F9) a
- Transfer (F2) l
- Change view (F4) o: Changes the view depending on the current page. A2.0 -> A2.1 -> A2.2 -> A2.0
- Main menu
- Close menu

- New destination (F7) z
- Help menu (F10) h
- Photo (F6) f: Create and view photos. The photos taken will be stored at the Load Carrier
- Keyboard
- SSCC Info (<-)
- Main menu
- Close menu
A2.0i Order/LC-Info
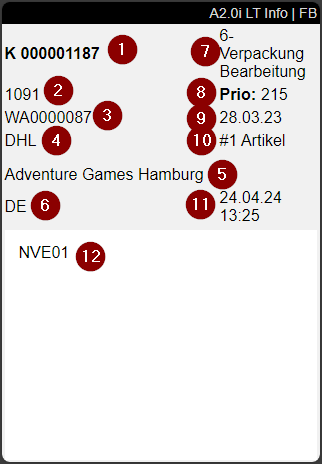
This info page can be accessed via the order/LC info menu of A2.0. The following information about the selected Load Carrier is shown here:
- load carrier number
- origin document no.
- Warehouse Shipment No.
- shipping agent code
- state of the warehouse shipment
- priority
- day of loading
- number of items
- time of last change
- customer name
- ship-to country
- comment text
Hinweis
The fields Origin document no. and Day of loading are only filled if it is a PTU or SSCC.
A2.1 Open move orders
A2.1 shows all currently open move orders. This view does not show the load carriers currently picked up. Press the F4 button for this view.
The structure and the information per entry are the same as in A2.0.
A2.1xk Filter
The move job filter is an important tool for the forklift driver to show certain movements according to his choice.
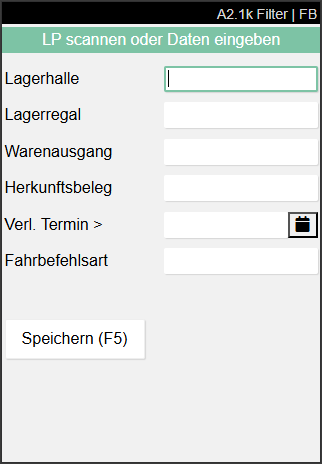
Here you can filter the available transports according to the following properties:
- Warehouse
- Storage Shelf
- Warehouse shipment
- Source document
- Ship. Date >: Filters for move jobs which are younger than the entered date
- Move order type:
- Storage bin transfer
- Replenishment
- Inbound Stock Post
- Return Order
- Loading preparation
- Manual Transfer
- Transfer to Production
- Picking Cancellation
A2.2 Picked up load carriers
A2.2 shows the load carriers currently picked up. Press F4 to switch back to the split view A2 Internal transports.
The structure and the information per entry are the same as in A2.0.