A3 Item transfer
The item transfer can be used to transfer item quantities from one load carrier to another. The difference to A2 Internal transports is that here it is not entire load carriers that are moved within the warehouse, but item quantities that change load carriers.
When A3 is used, move orders are automatically generated, employee markings entered and the start and end times of the move order stored.
As long as a reservation that points to an inventory is not split, a transfer may also be carried out.
Area A3 consists of the following parts:
Hinweis
Where possible, lines are shown cumulatively by load carrier and item.
Line sorting is based on the movement strategy code of the user's team.
A3.1 Item transfer overview
This overview shows the currently open transfer transactions.
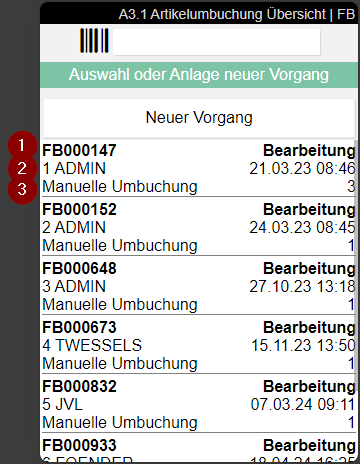
1: Move order number
2: State of the move order
3: User abbreviation of the user who created the move order
4: Time at which the move order was created
5: Move order type
6: Scope of posting - number of stocks in the transaction
A3.2 Item Transfer Take Out
This is the Take Out function of the item transfer.
Hinweis
If you want to transport a full load carrier within the warehouse, please use A2 Internal transport.
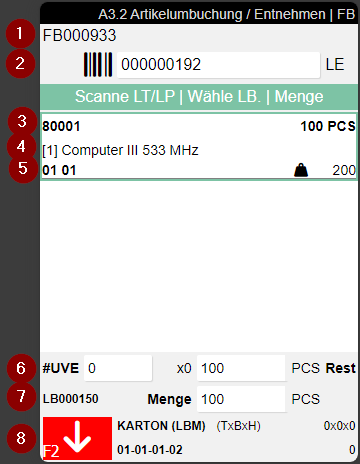
- The move job number
- Scan a load carrier or storage place here
- Left: Item no. | Right: Number of items in stock
- Item description
- Center: Target hint for the put-away. Displayed in this priority: (1) Picking storage place of the item, (2) Picking warehouse code, (3) Registered warehouse code + storage shelf | Right: Total weight according to item master data multiplied by quantity and variant if available
- Number of SPU x quantity + individual pieces
- Left: Inventory no. | Right: Total quantity to be taken out
- Inventory measure + dimensions. The red symbol shows that you are on the take out screen
Hinweis
For replenishment move jobs, the inventory list is automatically filtered to display only relevant entries. The filtering is based on the Inventory Swap in a Load Carrier setting in the SIEVERS WMS Setup.
Hinweis
Only load carriers, storage places and inventories of the warehouse location of the currently logged-in mobile user can be scanned and processed.
Process:
- Scan the inventory unit via Scan LC/SP
- Scan the desired inventory or select it from the list.
- Enter the desired quantity (confirm all or partial quantity)
- Repeat the process for further stock
- Press F2 to switch the mode from removal to *putaway
- The put to process is described in A3.3
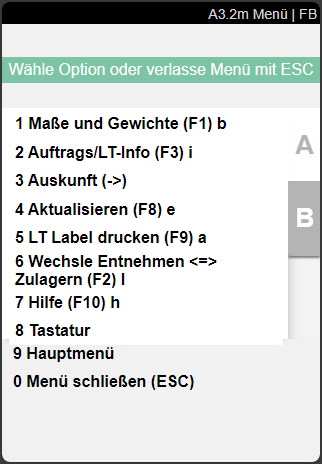
The A3.2 menu enables the following functions:
A:
- Dimensions and weights
- Order/LC-Info
- Information
- Update
- Print LC label
- Switch between Remove <=> Add to stock. Use this function to switch back and forth between A3.2 and A3.3.
- Help
- Keyboard
- Main menu
- Close menu
B:
- Internal transports. Switches directly to A2 Internal transports
- Create Load Carrier (F5) k: Creates a new load carrier für this transport
- All Inv on 1: LC/SP (F7) z:
- New Storage Place: Searches and assigns a new target storage place to the selected inventory.
A3.3 Item transfer Put To
This is the Put To function of the item transfer. It can be used to add item quantities recorded in A3.2 Take out to a load carrier or storage place. In this case, the function Storage Place: autom. allocation finds and reserves a storage place from the move order based on the Inbound Stock Post strategy.
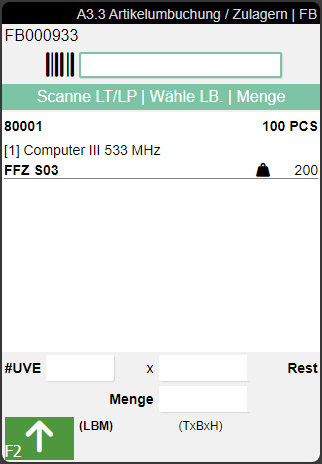
Process:
- Make sure that you are in Inbound Stock Post Mode. You can recognize this by the fact that the button at the bottom left is green and the arrow is pointing upwards.
- Two sequences are supported:
- Sequence 1 (target first): Scan a target storage place, load carrier, or blanco barcode. The scanned value remains in the input field with full selection. You are then prompted to select the inventory - select the desired inventory and confirm the quantity.
- Sequence 2 (inventory first): Select the inventory and confirm the quantity. The input field is marked red and prompts for Scan Target SP, LC or Blanco. Scan the target and the posting is completed automatically, without re-entering the inventory and quantity.
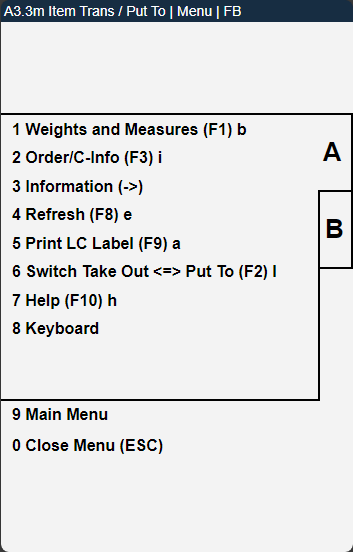
The A3.3 menu enables the following functions:
A:
- Dimensions and weights
- Order/LC-Info
- Information
- Update
- Print LC label
- Switch between Remove <=> Add to stock. Use this function to switch back and forth between A3.2 and A3.3.
- Help
- Keyboard
- Main menu
- Close menu
B:
- Internal transports. Switches directly to A2 Internal transports.
- Create Load Carrier (F5) k: Opens A3.3 Weights and Measures to create a load carrier and print a storage unit label