A1 Warehouse receipt
A1. Warehouse Receipt includes all processes and MDE pages relating to warehouse receipt. As a rule, you start with A1.1 WHS Receipt Overview.
Please note that A1 has an Input check for identification of incoming items. This stipulates that before an item can be processed, it must first be clearly identified. This is to avoid subsequent assignment errors.
Process:
- Enter a value in the scan/input field in pages A1.1, A1.2 or A1.3
- The system now checks whether a unique load carrier/receipt line could be identified with the input. a. If yes, depending on the existence of a load carrier, A1.4 Pos. Processing (for previously created load carriers) or A1.6 LC Creation (to create new load carriers) opens. b. If no, A1.2k WR Filter opens, where the user can search for the correct item with further filter options
A1.1 Rec. Overview
The view of A1.1 shows an overview of all current warehouse receipts, that have the state 0-Notified or 2-Released Mobile Device. The sorting is as follows:
- By state (first all released, then all notified warehouse receipts)
- If available, by arrival time in ascending order, otherwise by expected arrival in ascending order
- By warehouse receipt no. in ascending order.
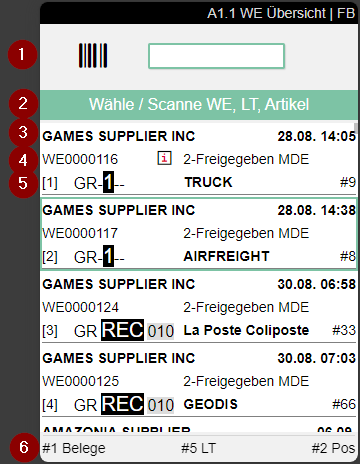
- Scan field
- Notes and feedback
- Start a new unloading process. This opens A1.0
- Left: Supplier name from the warehouse receipt | Right: Expected arrival
- Left: Warehouse receipt no. | Center: An i indicates that a comment text is stored. Access with F3 | Right: State of the warehouse receipt and employee marking
- Left: Unloading place | Center: Shipping agent | Right: Number of load carriers
Hinweis
If the supplier is a supplier with maintained GS1 identifiers, either A1.2 or A1.GS1 SSCC Receiving is opened after selecting a load carrier, depending on the presence of load carriers. If there are already load carriers at warehouse receipt, A1.2 is opened, otherwise A1.GS1 SSCC Receiving.
Menu:
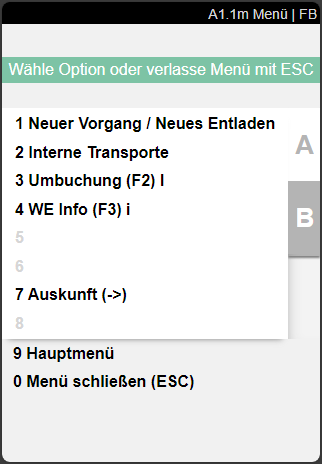
A:
- New Process / New Unloading: Creates a new unloading process. This sets the arrival time for the warehouse receipt.
- Internal Transports
- Transfer (F2) l
- WR Info (F3) i
- Update (F8) e
- Information (->)
B:
- Refresh (F8) e
A1.GS1 SSCC Receiving
This page opens when a GS1 barcode has been scanned in a warehouse receipt. This list only shows orders with receipt lines for the location in which the employee is currently logged in.
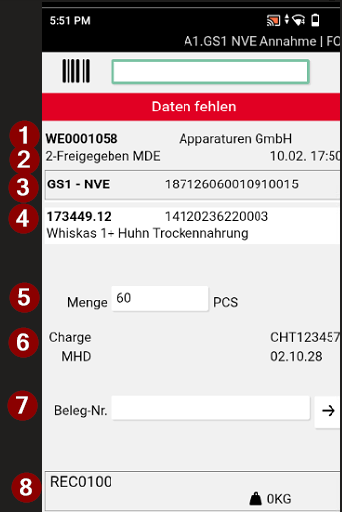
- Left: Warehouse receipt no. | Right: Supplier name
- Left: State | Right: Date and time of last state change
- Left: Type of warehouse receipt | Right: Identifier
- Item number, item description and GTIN
- Quantity
- Lot no. and Sell-By date
- Document no. The button on the right opens A1.GS1a - an overview of the orders. This allows the selection of the correct document if no barcode is available.
- Left: Storage place | Right: Weight
Menu:
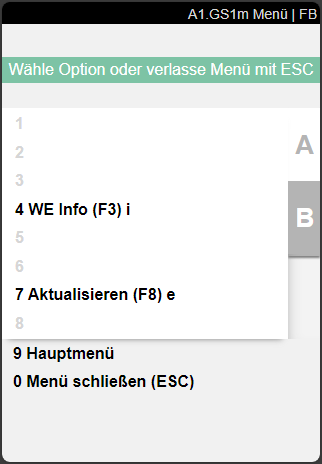
- WR Info (F3) i: Opens A1.GS1i WHS Receipt Overview WHS Receipt Info
- Document selection (A5) s: Opens A1.GS1a SSCC Source Documents
- Refresh (F8) e
A1.GS1 SSCC Source Documents
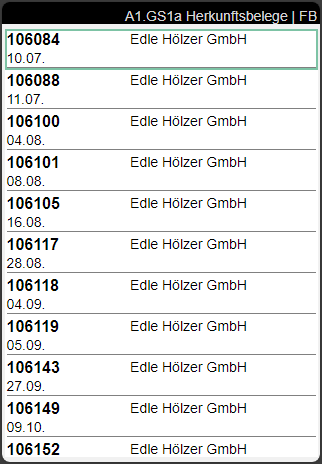
This list is accessed from A1.GS1 SSCC Receiving and shows all open purchase orders sorted by date. This allows the correct document to be searched for even if no barcode is available.
- Left: Document no. | Right: Vendor
- Document date
A1.1i Rec. Overview WR Info
A1.GS1i SSCC Receiving WR Info
A1.2i Load Carrier Overview WR Info
Shows information about the currently selected warehouse receipt.
Hinweis
A1.1 and A1.GS1i are the same contentwise.
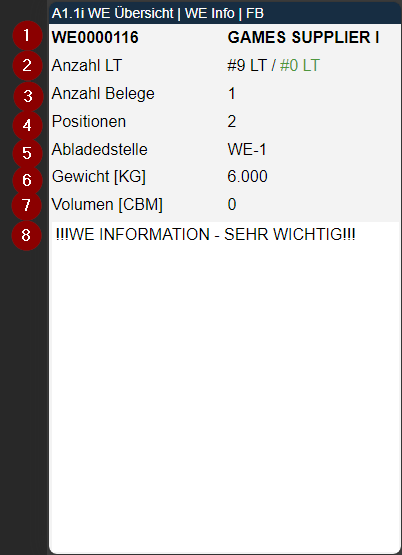
- Warehouse receipt no. and customer
- Number of load carriers in the Warehouse Receipt / how many load carriers have already been checked
- Number of source documents in the Warehouse Receipt
- Number of positions in the Warehouse Receipt
- Unloading place from the Warehouse Receipt header
- Total weight according to load carriers. If no load carriers are available, then gross weight from the packaging hierarchy
- Total volume according to load carriers. If no load carriers are available, then volume from the packaging hierarchy
- WHS Receipt Info
A1.0 New Unloading / Warehouse Receipt
On this page you can create a new warehouse receipt.
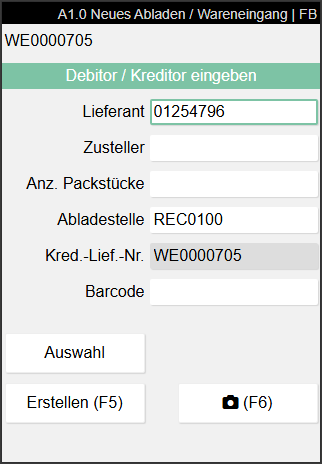
Either a supplier or a shipping agent must be entered. One of the two fields can remain empty. Alternatively, you can select a vendor or a customer via Selection. The other fields must all be filled in.
Hinweis
If some of the fields are greyed out and not editable please check the Whse. Rcpt. Mandatory Fields in the SIEVERS WMS Setup.
Use the button at the bottom right or the F6 key to take one or more photos of the truck before unloading. These are saved in the warehouse receipt and later also in the booked warehouse receipt in the fact box.
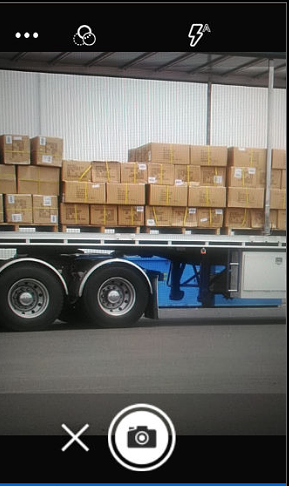
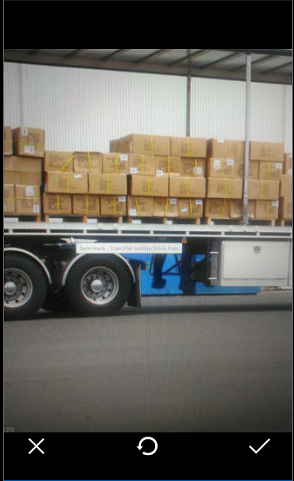
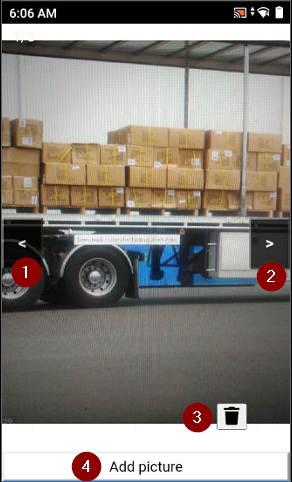
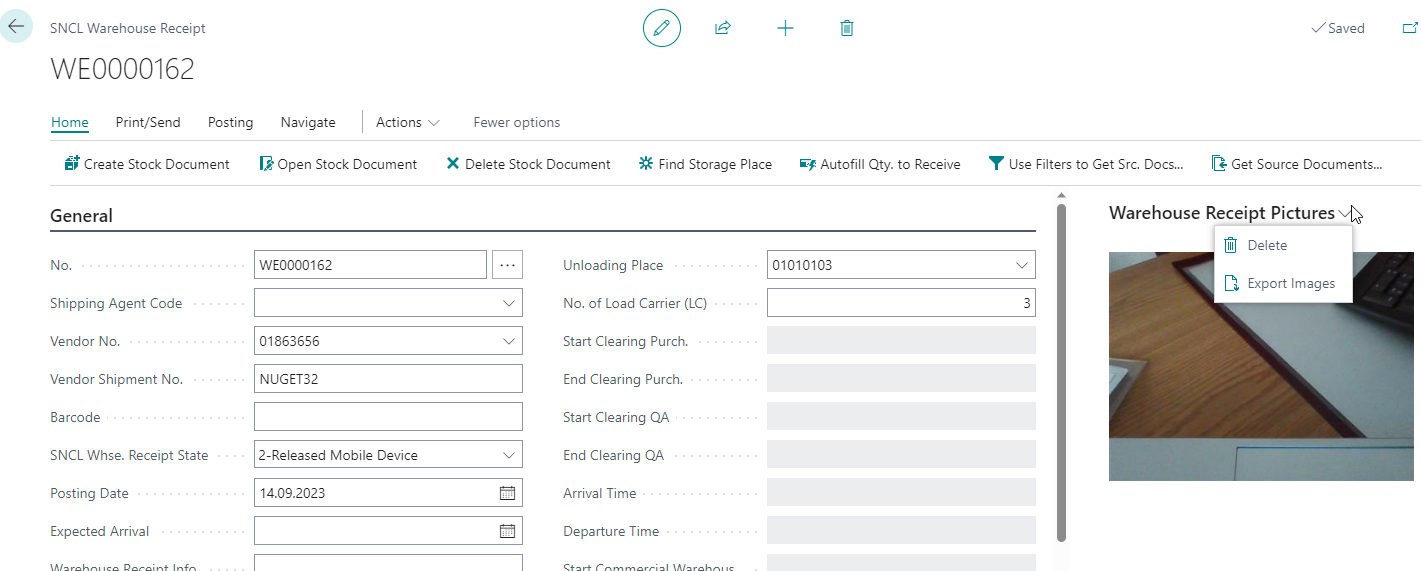
The last photo taken is always shown here. Further photos can be taken. To see these, the photos must be exported from the factbox. You can delete all photos with Delete.
When you are finished, create the warehouse receipt with Create or F5. If the process was successful, the system gives feedback in the form of the green banner Warehouse receipt created.
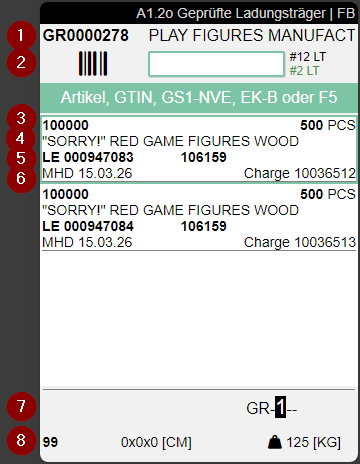
A1.2 Load Carrier Overview
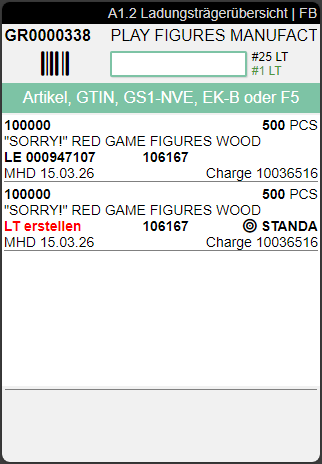
The load carrier overview shows both the load carrier lines created in advance in the warehouse receipt and the document lines for which load carrier lines still need to be created.
The load carrier overview can be opened from A1.1 Rec. Overview by selecting a warehouse receipt process or by creating a new warehouse receipt process in "A1.0 New Unloading".
You can also manually assign receipt lines to this load carrier. To do this, access the menu B8 or enter a source document number manually to add it to the warehouse receipt. However, this is only recommended if there are very few documents.

- Left: Warehouse Receipt Number | Right: Vendor
- Scanfield for Load Carrier
- Left: Item Number (last 15 characters) | Center: Info symbol, if a comment text is stored on the Load Carrier | Right: Number of pieces
- Item description
- Left: Load carrier type and number or GS1-SSCC number | Middle: Last 9 characters of Source No. | Right: New Storage place or shortened Inbound Stock Post strategy
- Left: Create LC means that no load carrier exists yet
- Left: Supplier | Right: Current Storage Place (From warehouse receipt header or, if different, from load carrier line)
- Left: Inventory Measure Code | Middle: Dimensions | Right: Weight
Hinweis
If the item has a sell-by date or lot no. obligation, a fourth line is displayed showing the sell-by date and/or lot no.:
Clicking or pressing enter on a Load Carrier leads to A1.3 Position View.
Menu:
A:
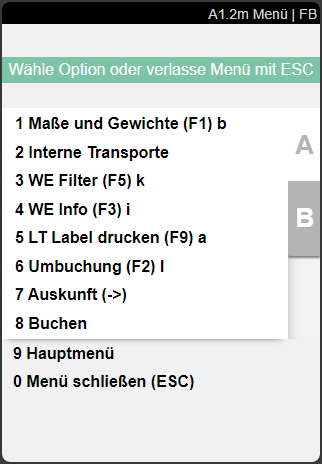
- Weights and Measures (F1) b: Opens Weights and Measures
- Internal Transport: Opens A2.0 Internal Movements
- WR Filter: Opens A1.2k warehouse receipt filter. Has no function on A1.2o (F5) k
- WR Info (F3) i
- Print LC Label (F9) a: Prints an LC Label of the selected load carrier
- Transfer (F2) l
- Information
- Post
B:
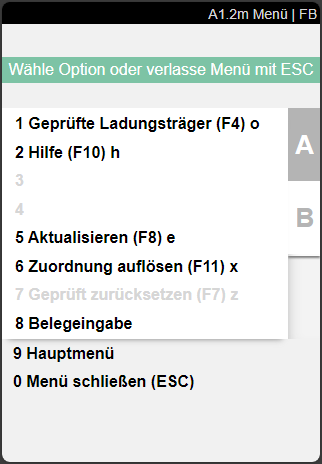
- Checked load carriers (F4) o: Opens A1.2o Checked LC Overview
- Help (F10) h
- Refresh (F8) e
- Dissolve Assignment (F11) x: Dissolves the document line - load carrier assignment. The items can now be assigned to another load carrier
- Reset Checked (F7) z: Resets already checked load carriers (view via A1.2o) to unchecked status
- Source Document Entries: Enables the manual assignment of source documents
A1.2k Load Carrier Overview Warehouse Receipt Filter
The WR filter is required to identify pre-filled load carriers or receipt lines in a warehouse receipt (or several warehouse receipts via A1.1) with regard to their identity and quantity so that they cannot be mistaken.
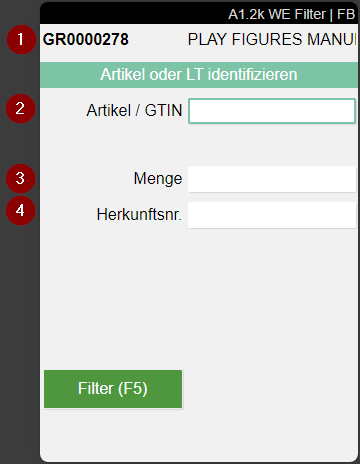
- Left: Warehouse Receipt No. | Right: Vendor / Shipping Agent
- Input field for Item No. / GTIN
- Input field for open and unchecked Quantity
- Input field for Source No.
Process:
- The warehouse receipt employee can open the filter at any time with F5 (ctrl+k)
- The employee enters one or more values until a load carrier line (or several identical ones) or a document line quantity has been identified
- The Filter (F5) button turns green, the employee presses F5. The employee is now shown the filtered page A1.2. As long as there is no uniqueness, the button is yellow. If several load carriers remain after all filter options have been used, the button turns green and the load carrier with the lowest load carrier number is selected.
A1.2a Load carrier Overview Src. Doc. Entry
If the warehouse receipt is a small delivery, employees can use this view to assign source documents individually, saving them a trip to the office or computer.
Hinweis
It is not recommended to enter a large number of documents via this view. This should still preferably be done via the classic document-oriented warehouse receipt.
When accessing receipt entry, you will first see an empty list. You can either enter a document number or scan it. You also have the option of clicking on the arrow to get an overview of all open purchase orders.
If you have just created a fresh warehouse receipt with supplier in A1.0 New Unloading, the list is filtered according to the supplier entered.

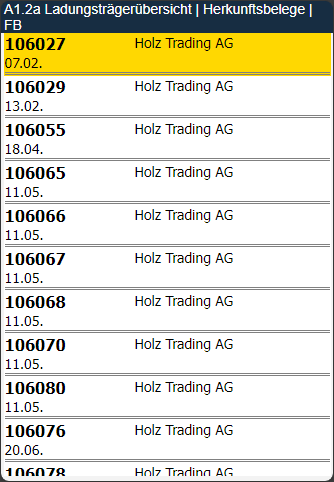
Now select the desired document. Only documents with open lines can be selected.
If you have selected a source document, all open lines are shown. You can now select a single line, which is loaded in A1.2 Load carrier overview. The load carrier creation can then be started there.
A1.2o Checked LC Overview
With A1.2o Check Load Carrier Overview you can view an overview of already checked load carriers. You can enter the page via CTRL+O or via menu.
- Left: Warehouse Receipt No | Right: Vendor
- Middle: Scanfield for search for checked Load Carriers | Right: Number of Items in the Load Carrier
- Left: Item No. | Right: Number of Pieces
- Notice
- Left: Last 9 characters of Source Document | Middle: Target Storage Place
- Left: Best Before Date | Right: Lot No.
- Right: Storage Place (From Warehouse Receipt Header or, if different, from load carrier line)
- Left: Load Carrier Type | Middle: Dimensions | Right: Weight
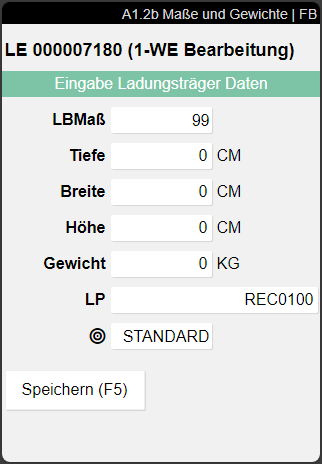
A1.2b Weights and Measures
On this page, you can change the following properties of the Load Carrier:
- Inventory measure
- Dimensions
- Weight
- Storage place
- Inbound Stock Post strategy
A1.3 Position View
This page provides information and shows the item positions of the load carrier. You can enter it by using Enter on a load carrier in A1.2 Load Carrier Overview.
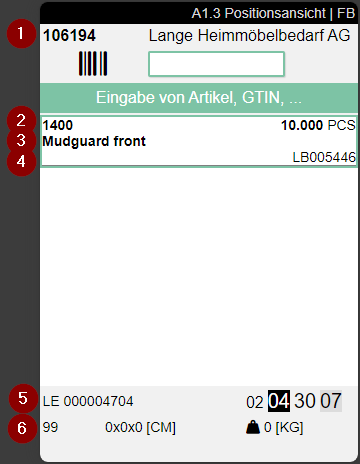
- Left: Warehouse Receipt No. | Right: Supplier
- Left: Item No. | Right: Quantity
- Left: Item Description
- Right: Inventory No.
- Right: Load Carrier Type and Load Carrier No. | Right: Storage Place of the Load Carrier
- Right: Inventory Measure Code | Middle: Dimensions | Right: Weight
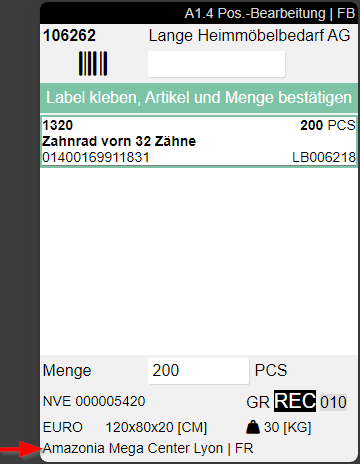
A1.4 Pos. Processing
When an incoming load carrier has been clearly identified, this page opens. Here, the Warehouse Receipt employee can check and release the load carriers content. If an i is visible in a line, a comment text has been stored for this. You can access this via Info (F3).

- Left: Order no. | Center: Camera symbol = picture available. Access with F6 | Right: Supplier
- Item no. | Right: Number of pieces to be checked
- Description of the item
- Left: GTIN from the item reference, which corresponds to the basic unit of measure | Right: Inventory no.
- Sell-by date and Lot no. if available
- Enter quantity
- Left: Load Carrier type and number | Right: Storage place from warehouse receipt or (if different) load carrier line
- Left: Inventory measure code | Center: Dimensions | Right: Weight
Process:
Click on the correct item and enter the quantity. If there was only one load carrier, the quantity is filled automatically. Confirming with Enter opens A1.5 LC Confirmation. If there is only one item in the list, the system will automatically select it. However, the user is still required to confirm the quantity.
If a shipping destination (Ship-to Name, Ship-to City) is already assigned to the load carrier, this is shown at the bottom:
Menu:
A:
- Weights and Measures (F1) b: Opens the screen for entering the dimensions and weight of the load carrier
- WR Info (F3) i: Opens A1.4i
- Picture (F6) f: Show or take item picture
A1.5 LC Confirmation
A1.5 Load carrier confirmation appears whenever a quantity of a load carrier is confirmed in A1.4. Here you can scan a load carrier barcode to mark it as checked. You can confirm all similar load carriers that are part of the warehouse receipt and have the same contents. The load carrier will be removed from A1.2. If the users want to reset the checked-state, they have to do this via A1.2o. Only checked load carriers can be posted later with the Warehouse Receipt.
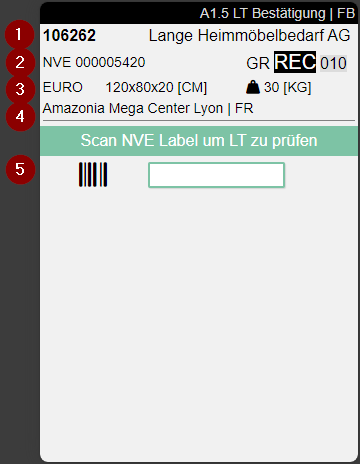
- Left: Order No. | Right: Vendor
- Left: Load Carrier Type and Code | Right: Storage Place (from WHS Receipt header or, if different, from load carrier lines)
- Left: Inventory Measure Code | Middle: Dimensions | Right: Weight
- Ship-to Name and Ship-to Country
- Here you can scan a PTU, SSCC or Blanco Barcode
Menu:
A:
- Dimensions and Weight (F1) b: Opens the screen for entering the dimensions and weight of the load carrier
A1.6 LC Creation
This page is used in the in the Warehouse Receipt process for the users to be able to create new load carriers during the process. The page has the following functions:
- Create several load carriers of the same type
- Assign a quantity (partial or complete quantity) to a single, new load carrier using a Blanco Barcode
- Add a certain quantity to an existing load carrier: The following rules apply:
- The load carrier must not be blocked.
- Checked and unchecked load carriers remain in their respective states.
- When put to PTU or SSCC, the system checks whether the warehouse shipment to which the order belongs matches the target SSCC. If no warehouse shipment has yet been assigned to one of the documents, the document must be identical.
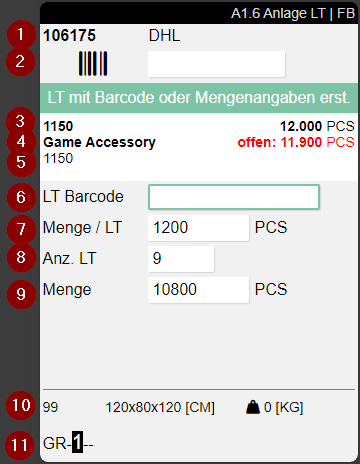
- Left: Purchase Order No. | Right: Vendor Name or Shipping Agent
- Scanfield to scan Item or GTIN
- Left: Item No. | Right: Number of Pieces
- Left: Item Description | Middle: Camera symbol when a photo is stored on the item card. Access with F6 | Right: Quantity remaining
- GTIN
- Field for a single Load Carrier Barcode. Only editable if No. LC = 1
- Quantity to be assigned to Load Carriers
- Number of necessary Load Carriers
- Calculated Quantity from 7 and 8
- Left: Inventory Measure Code | Middle: Dimensions | Right: Weight
- Storage Place
Process:
- Scan a Barcode
- Quantities will be entered automatically
- Assign weights and measures with A1.6b LC Creation | Weights and Measures
- Create Load Carriers via menu A8 or hotkey F5
- The corresponding labels for the load carriers that have not yet been printed are printed automatically
- The created load carriers are automatically marked as checked
Hinweis
The quantity suggestion in field Qty. / LC is based on the item's packaging hierarchy (usage Load Carrier Creation). If the remaining quantity is at least equal to the value defined there, it is used as the suggested quantity. If no such entry is maintained, the full remaining quantity is suggested. This applies to both regular items and serial number-tracked items.
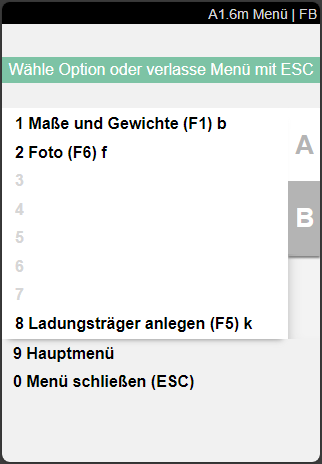
Menu:
- Weights and Measures (F1) b
- Create Load Carrier (F5) ctrl+k
A1.6b LC Creation | Weights and Measures
With this page users are able to enter an Inventory Measure Code, Weight and Measures for new load carriers when creating them in A1.6 LC Creation.
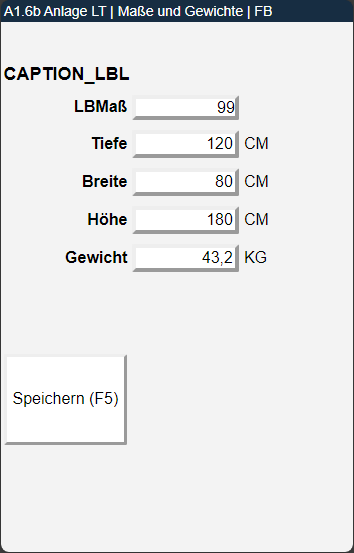
Process:
- Enter an item in A1.6 LC Creation
- Assign weights and measures
- Save values via Save button
A1.6s LC Creation | Serial Number Entry
The page A1.6s enables the entry of serial numbers when creating load carriers in the warehouse receipt. This function is designed for cases where no load carriers have been created in advance in the SNCL warehouse receipt and therefore no serial numbers can be transferred from pre-entry.
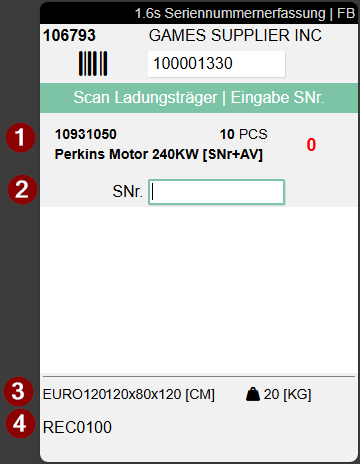
- Left: Item no. and item description | Center: Quantity | Right: Serial no. counter. If the counter is red, it means that not all serial numbers have been entered yet. The number of serial numbers is less than the number of load carriers requiring serial numbers. If the counter is green, all required serial numbers have been entered
- Serial number input. Newly scanned serial numbers are added at the top of the list, so that the most recently entered numbers are always directly visible without having to scroll. The serial numbers entered so far are displayed in the white area below this field.
- Left: Inventory measure and dimensions | Right: Weight
- Storage place
Trigger:
The page A1.6s opens automatically after quantity confirmation in A1.6 when:
- a serial number requirement exists in the receipt line from A1.2
- and no load carrier has been created yet in the SNCL warehouse receipt
Process:
- In A1.6, a blank barcode or an empty load carrier is scanned
- For items requiring serial numbers, the message "Enter serial numbers next" appears
- After quantity input, A1.6s opens automatically
- The focus is automatically on the serial number scan field
- Exactly one serial number is entered per unit of measure
- A quantity counter shows progress: Red for incomplete entry, Green for complete entry
- With F5, the entry is completed, the load carrier is marked as checked, and the load carrier label is automatically printed
Restrictions for serial number requirement:
- Splitting the quantity across multiple load carriers is not possible – the fields Qty / LC and No. LC are disabled
- Only one load carrier barcode can be scanned
Validation:
When scanning a serial number, a plausibility check is performed:
- "Serial no. is already contained in Warehouse Receipt" – The serial number has already been entered in this warehouse receipt
- "Serial no. - Item already exists in inventory" – The combination of serial number and item number already exists in inventory
Menu:
- Weights and Measures (F1) b
- Check Load Carrier (F4) ctrl+o
- Complete Serial Number Entry (F5) ctrl+k
Hinweis
The "Retrieve Photo" function (F6) is not available in A1.6s. An automatic completion when reaching the target quantity does not occur – the entry must be completed manually with F5.