Process a document-oriented warehouse shipment
In this process description, a complete document-oriented warehouse shipment is carried out as an example. Please note that there are likely to be differences between the process described here and your warehouse logistics process. If you have any questions, please get in touch with your contact person at SIEVERS.
This process description assumes that the following setups have been made:
- Customer
- Shipping agents
- Logistics teams for picking and packing
- Storage places
- Inventory measures
Warehouse shipment essentially consists of 5 steps:
- Creation of a sales order
- Creation of a warehouse shipment
- Creation of a Outbound Stock Post
- Execution of the internal logistics steps a. Picking b. Packaging b. Packaging c. Loading
- Posting of warehouse shipment
Creation of a sales order and warehouse shipment
This step does not differ from the creation of a sales order in the Business Central standard.
- Create a new sales order via the sales orders list
- Enter all information relevant to the sales order. You can also enter details such as the packing team, unloading place or priority in the SIEVERS WMS section.
- Once you have finished, release the sales order. During this process, the sales order is checked for the correct entry of mandatory fields.
- Then generate the warehouse shipment from this sales order.
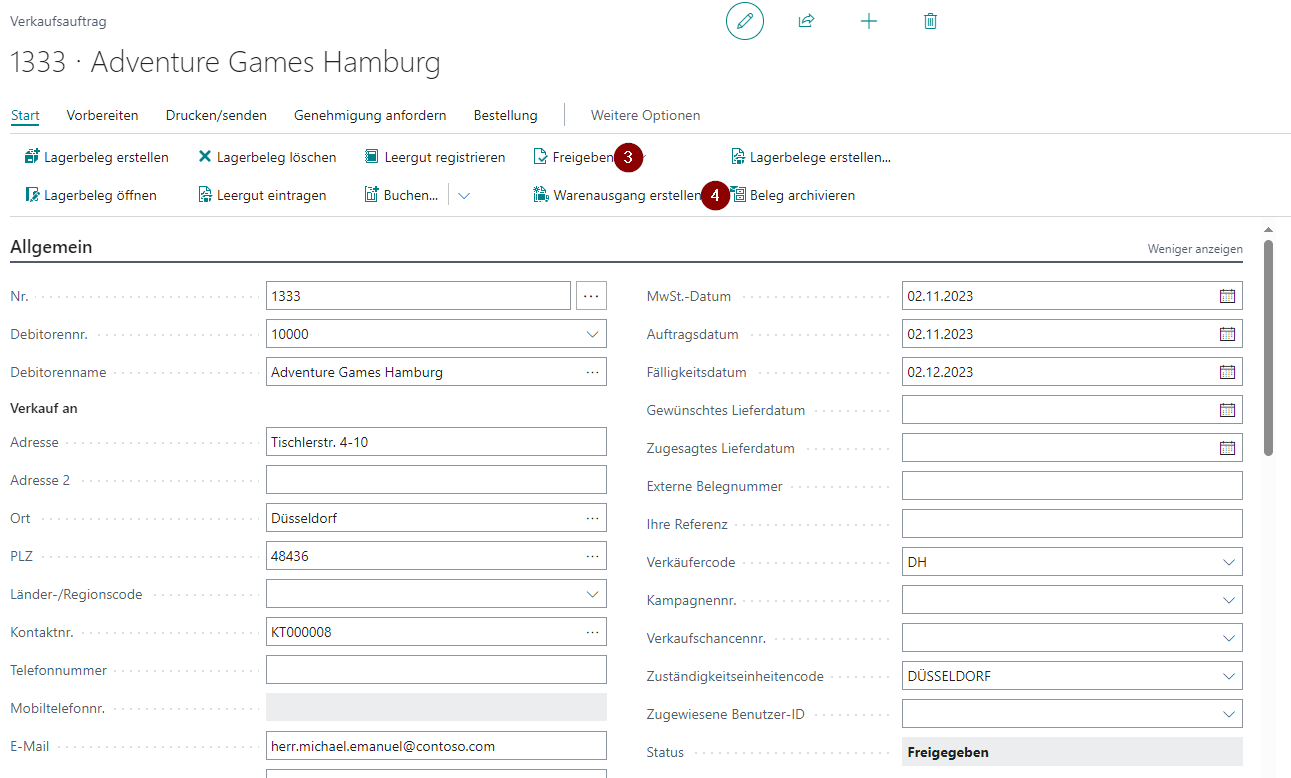
- The Warehouse Shipment Planning opens automatically and confirms the successfully created warehouse shipment. This has now also been automatically marked in the overview.
If you add new lines to the sales order, they are not automatically added to the warehouse shipment. If you want them to be, you have to activate the Add to Warehouse Shipment from Source option in the SIEVERS WMS Setup.
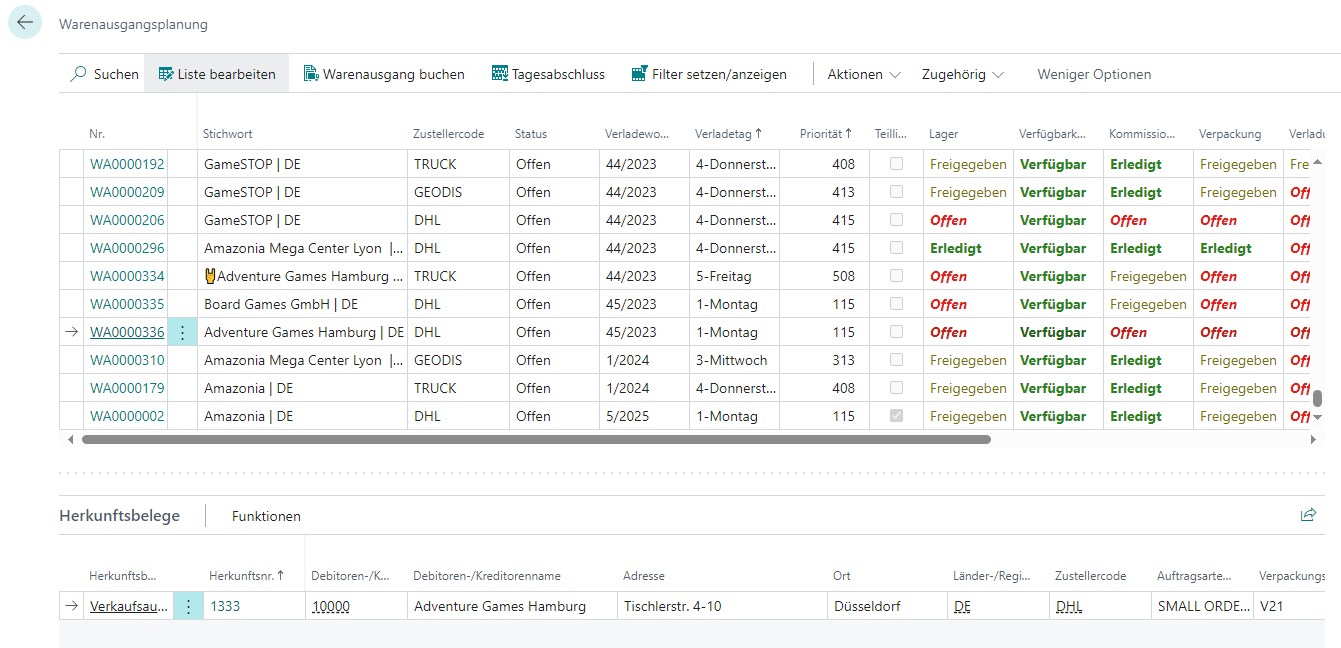
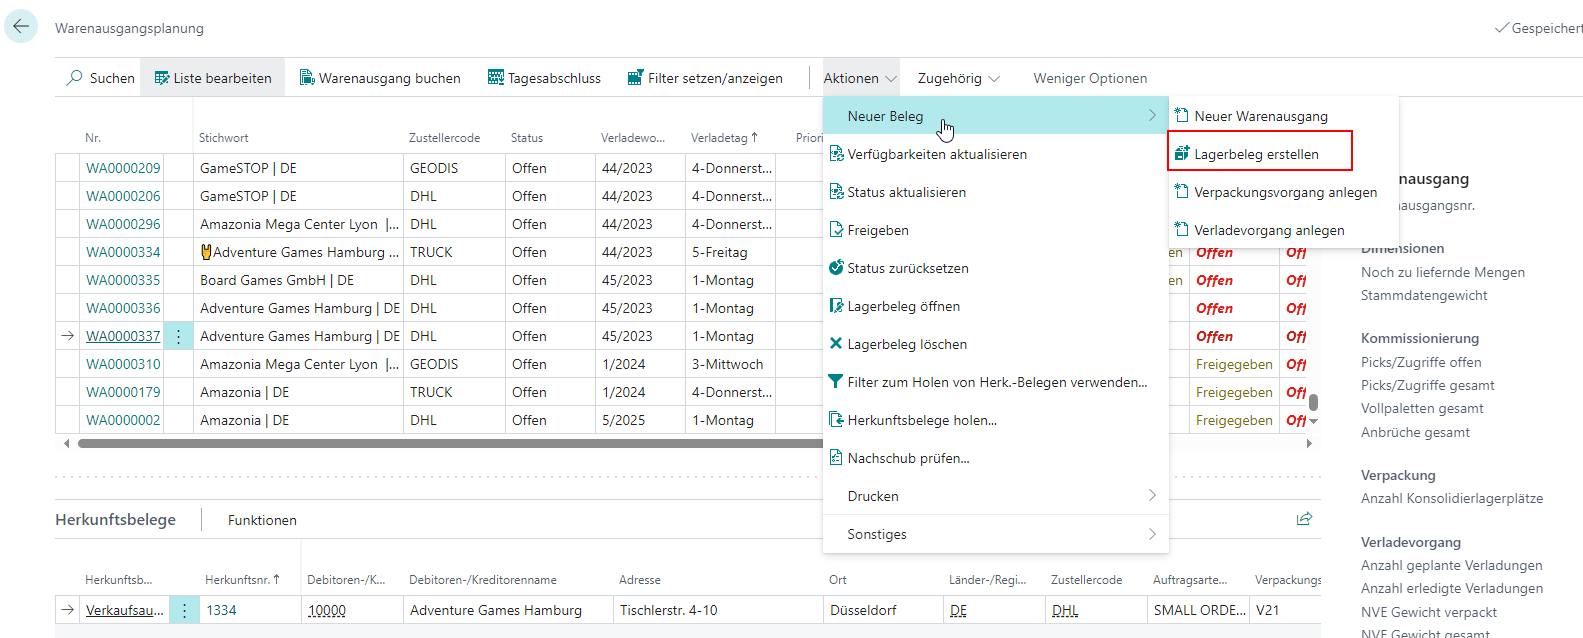
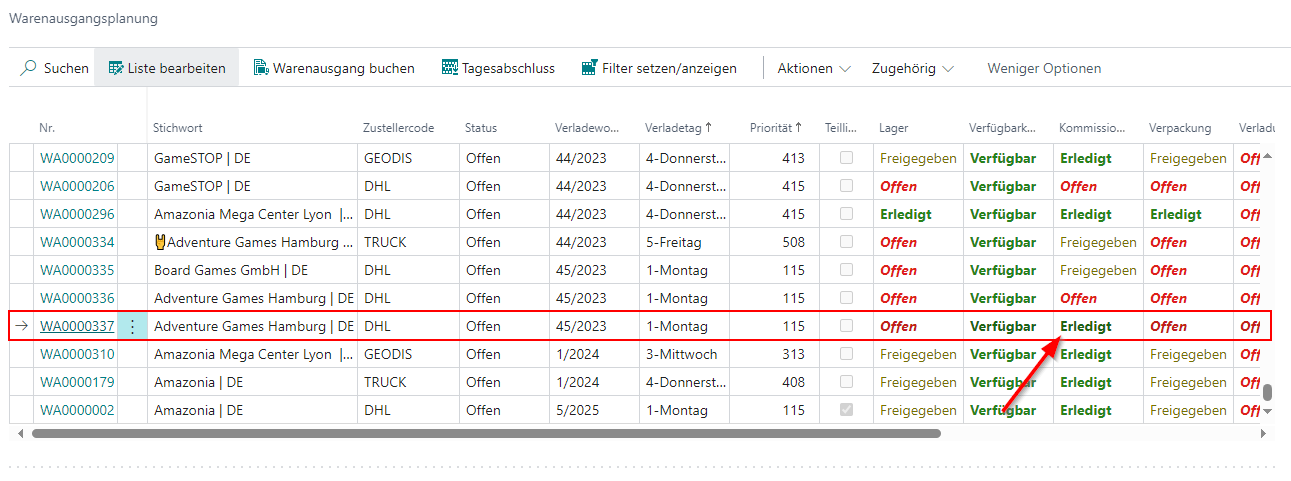
Creation and progress of the warehouse shipment document and picking document
- Now create the stock removal document from Warehouse Shipment Planning. Please note that all assigned orders must have a packing team defined. If this is not the case, you can do this in the source documents table below.
Hinweis
Please make sure that the SIEVERS WMS teams are correctly maintained. Only then can the appropriate teams be assigned automatically.
- A picking document is automatically created and the Pick documents print/release view is opened. You can now select to print the picking document. Leave the settings as they are. You should only adjust the printer selection to a printer available to you.
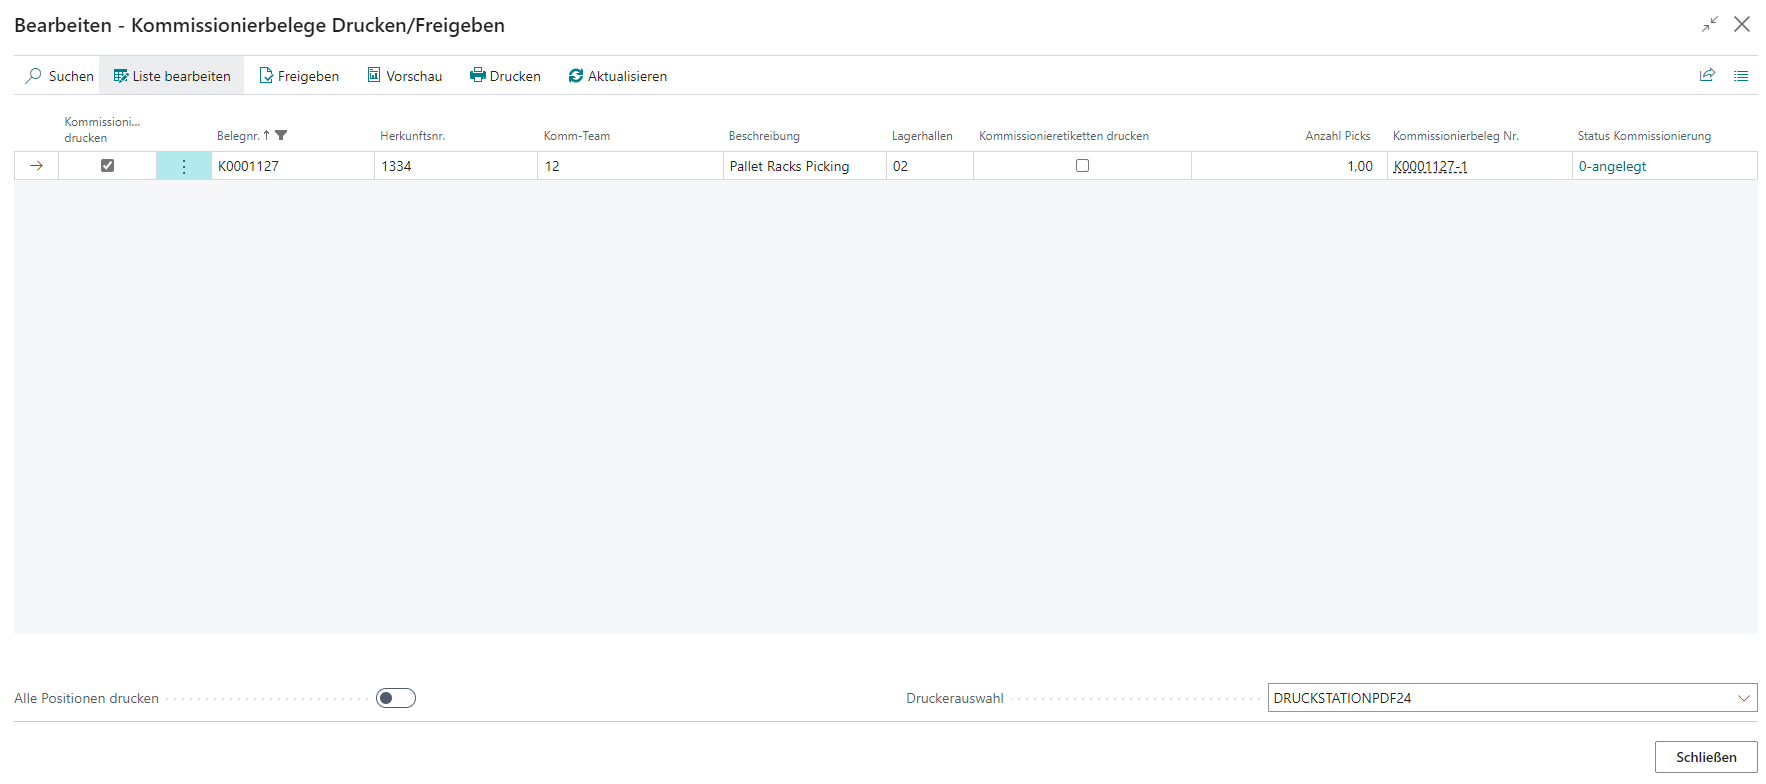
- Now print the picking document via Print. The finished document looks something like this:
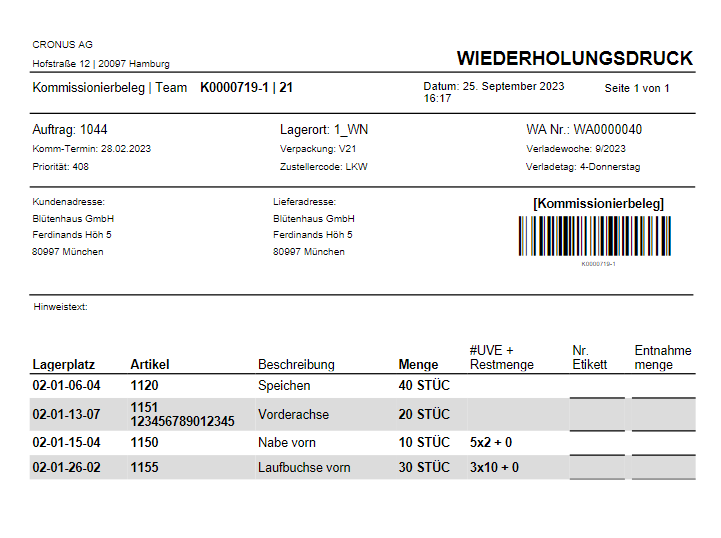
- The picker now has the task of carrying out the picking with this picking document and enough Blanco Barcodes.
- To do this, he goes through the items in the document one after the other and adds the picked items to a picked load carrier (PTU). To do this, he scans a Blanco Barcode, sticks it on the picking document and numbers it. He enters this number in the Label no. field. The picked quantity is entered in Picked quantity.
- When the picker is finished, he takes the load carriers with the picked items to the place where the picking document is confirmed. Here, the Blanco Barcodes are scanned into the scan field of the picking document in Business Central and new Load Carriers are created.

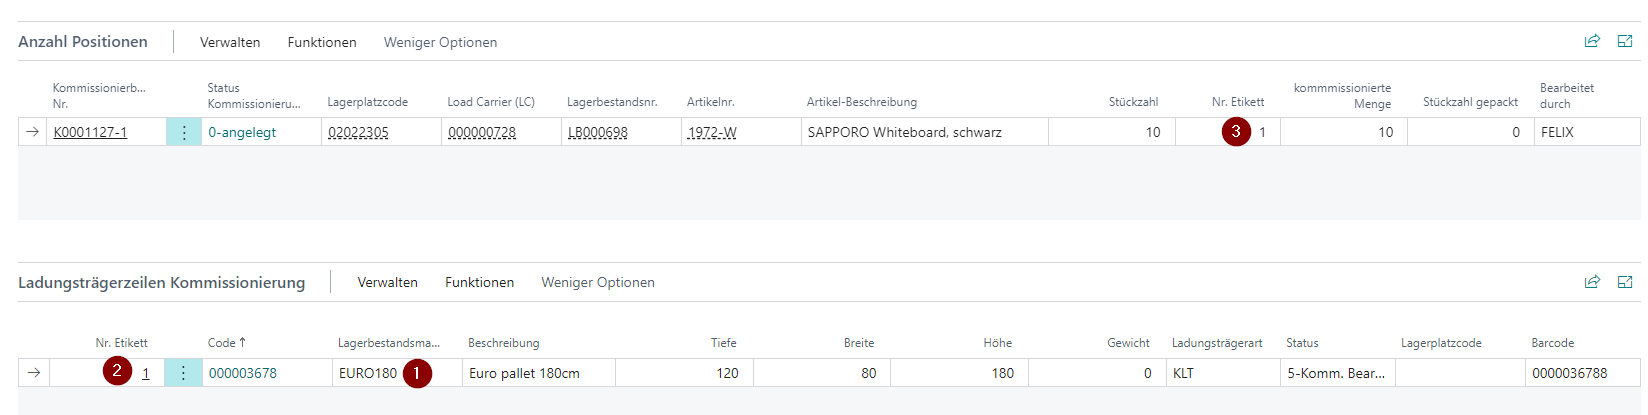
- a new Load Carrier is then added at the bottom of the Picking load carrier lines area. First select the correct inventory measure (1). Then transfer the Label no. from the load carrier lines (2) to the corresponding field in Number of positions (3). This assigns the items to the load carriers. It is also possible to assign items from other orders to this PTU as long as they are assigned to the same warehouse shipment.
- if the picking team is linked to a packing team via logistics team setup, a suitable storage place code is automatically entered in the Picking load carrier lines, which serves as a transfer to the packing team. If this is not the case, you can also enter one manually by selecting Post Load Carrier to storage place under Functions.
Hinweis
If a picking document is completely picked, all associated PTUs and SSCCs are set to state 2-recorded or to state 7-packed.

- you can now respond to the picking document (1). If everything was successful, a corresponding message is displayed (2). If the number of pieces column in the picking items contains a smaller quantity than the total quantity to be picked, only a partial response is issued.
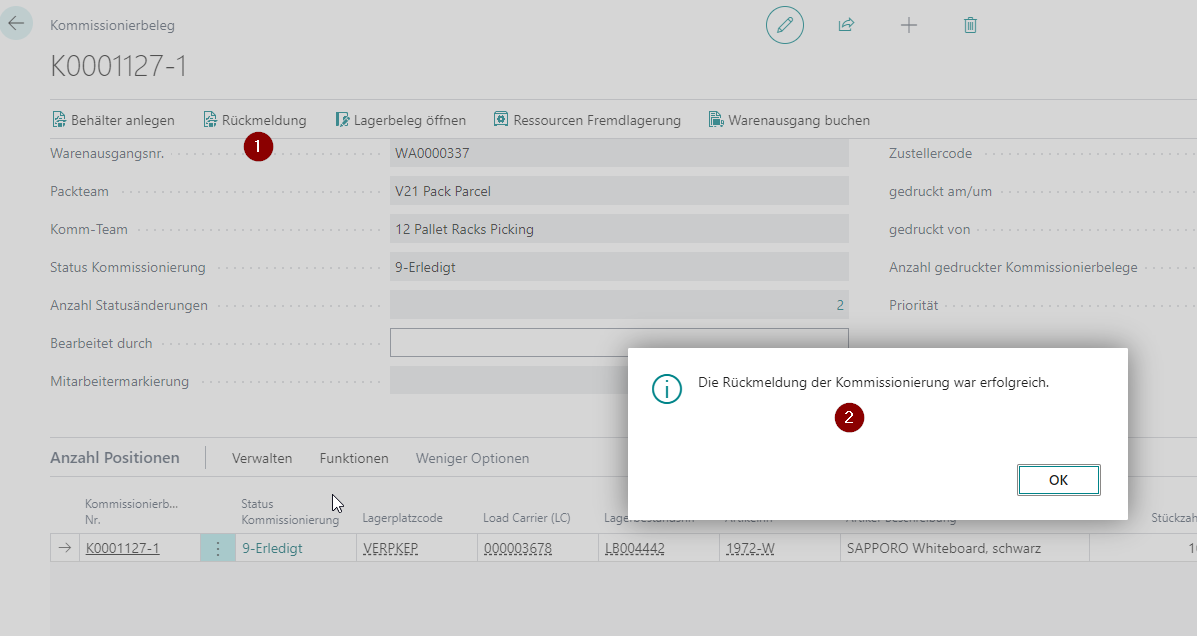
- the state of the document and the individual items in the picking area is now set to 9-Done. This is also reflected in Warehouse Shipment Planning.
Hinweis
After posting the warehouse shipment, the used/filled PTUs are automatically archived and can then be found in the post. Load Carriers list. Empty PTUs are not archived.
As soon as the first PTU has been created and has the state 2-Recorded, a packaging process is automatically created.
Perform A Picking Series
A picking series is a combination of several orders in one picking process. This means that the picker does not have to process one order at a time, but is assigned the picking of items from various similar orders, which can save time and travel.
Please note that the following must be prepared for a picking series:
- Picking series no. stored in the SIEVERS WMS setup
- Series picking must be activated in the SWMS Feature Setup.
- Order Types must be active for series creation
- The Picking team must have the series picking option activated
- A correct series creation strategy must be created
- There can be an automatic run of the SNCL Create Picking Series task in the job queues
Essentially, the progress of a picking series works like normal picking, especially if Automatic release is checked in the series creation strategy. This means that the picking series does not have to be released via the series monitor. After creating the stock document for an order in Warehouse Shipment Planning, the picking series is progressed as follows:
- If SNCL Create picking series does not run automatically, you must perform this task manually. To do this, select the desired series creation strategy in the task and execute it.
- If the series creation strategy has been configured correctly, you can now view the series created in the series monitor. If you have activated automatic release, a picking document has already been created that can be carried out. Otherwise, you must release the series via the series monitor. Depending on the release, the series currently has the state 0-Created or 1-Released.
- A largely normal picking document has now been generated. The difference is that the source no. and the warehouse shipment no. are empty and the picking series no. has been filled instead. The reason for this is that this picking can contain several orders and therefore cannot be assigned to either an order or a warehouse shipment. The picking lines were combined as far as possible using the Load Carrier no., storage place no. and item no. The consolidation number is incremented according to the packing together rules to ensure correct order separation during packing.
- The employee now progresses the picking as normal - with the difference that he does not pick into PTUs, but into series transport units (STUs). As soon as the picking document is printed or the process is selected on the MDE, the series changes to the 2-In Progess status.
- Once all positions have been picked, the document changes to 3-Picked.
- If a shortage has been found, the system automatically detects this circumstance and either finds an alternative stock or changes to status 5-In Clarification.
Now the picking is complete. The picked items are now in STUs but must be distributed to the appropriate orders. This is where serial distribution comes into play.
Perform a Series Distribution
This process covers the distribution of items that have been collected in STUs with a picking series to their matching orders.
- As a rule, after completion of the picking series or placing the first carrier, a series distribution was automatically created via a mobile device. You can see this in the SNCL Series Monitor based on the already assigned Series Distribution No.. If there is no number there, this is due to the activated WMS setup Disable Automatic Serial Distribution Creation. In this case, you can also manually create the series distribution with the action Release Series Distribution in the Picking Series Monitor.
- Open the appropriate series distribution via the Series Distribution No. or the list Series Distribution. This is empty when first opened. To start the process, scan or enter the first STU No. in the appropriate field.
- The table in the middle and the order quantities table will then fill with the content of the entered STU.
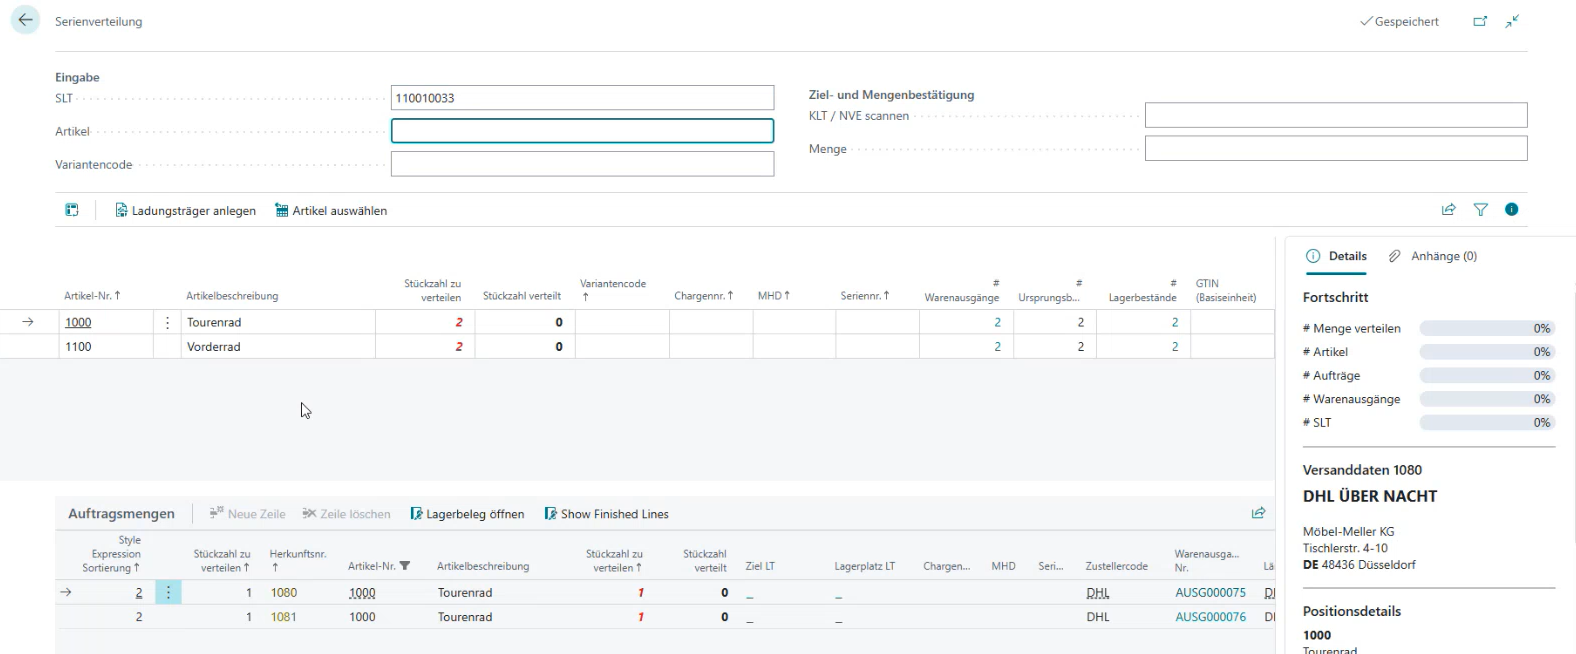
- The table in the middle shows the actual content, how much of the item still needs to be distributed and how much has been distributed. The order quantities table shows how many items from the STU are to be distributed to which orders. This can be identified by the source no., the warehouse shipment no. and the number of pieces to distribute field. The colors of the source numbers mean the following: Green: With the currently selected line, the order is complete and can be made ready for shipment and shipped | Yellow: The source document receives several more lines with the same distribution process | Red: For the order, there are lines in other pick lists or open lines in the warehouse shipment. The order must be consolidated after the line in the packaging or later.
- Now select the item that is on top or most easily accessible to you, and scan the number in the Item field. Both lists in the middle will then be filtered to this item. If necessary, enter a variant code. You can change the storage place manually.
- Now you can see in the Order Quantities table or in the FactBox how many pieces need to be packed for each order.
- Scan a blanco barcode or an existing PTU/SSCC in the Scan PTU / SSCC field or create a new carrier via action. This will write this carrier number to the Target Load Carrier field at the selected position in the Order Quantities table. The Storage Place Load Carrier field should now show the storage place of the packing team where you are ideally located.
Hinweis
The system automatically prevents uncontrolled packing together. Source document lines from different warehouse shipments cannot be packed into the same load carrier. If the "Order Specific WS" flag is additionally active on the warehouse shipment, different orders also cannot be packed into the same PTU or the same SSCC.
- Place the item in your hand into the new carrier and enter the quantity in the corresponding field. This reduces the number of pieces to distribute in both tables and in the Order Quantities table the entered quantity is shown in the current line in the number of pieces distributed field.
- Then take the next item from the STU and continue with the process. Scan item, enter variant code if necessary, scan target carrier, enter quantity. The FactBox or the top line in the order quantities tells you how much you should pack into the carrier. Over time, the progress bars in the FactBox change. If the source no. in the order quantity line is green, this is the last item of this type for this order.
- You do this until the STU is empty. Then you take the next STU and continue. Scan item, scan PTU, enter quantity. The order of the items does not matter. The series distribution always automatically filters to the correct lines and orders. Multiple STUs can also be processed simultaneously.
Create and Execute MOP Batch
A MOP batch combines multiple orders for multi-order picking. The picker processes items from different orders simultaneously, saving time and travel distance. Important difference to series picking: Picking is done order-pure into separate containers/compartments.
Prerequisites:
- MOP batch number series stored in SIEVERS WMS Setup
- Order types activated for MOP batch creation
- MOP batch creation strategy created
- At least one MOP cart with configured compartments available
- Warehouse shipments released
- Optional: Automatic run of task SNCL Create MOP Batches in job queue
Create MOP Batches
Prerequisites for orders:
- Status: Released
- First loading date within the lead time horizon (delivery date)
- Meet the filter criteria of the strategy (order type, delivery country category, customer filter)
Creation - three options:
1. Via search (Ctrl+Q):
- Ctrl+Q → SNCL Create MOP Batch
- Optional: Select specific MOP batch creation strategy (empty = all active strategies)
- OK → System shows number of created batches and orders
2. Via warehouse shipment planning:
- Open warehouse shipment planning → Create MOP Batch
- Optional: Select strategy
- OK
3. Automatically via job queue:
- Job queue entries → New entry with codeunit SNCL Create MOP Batches
- Define execution interval (e.g., hourly)
- Optional: Filter to specific strategy
- Activate entry
Hinweis
If the Custom Event field is filled in the MOP batch creation strategy, an event with the stored code is triggered instead of the standard process.
Batch creation logic:
- Order determination: System determines qualified orders according to criteria (status, order type, delivery date, filter)
- Sorting: By loading date (ascending) and priority (smallest first)
- Batch composition:
- Considers all SNCL outbound warehouse entry lines with code MOP Batchwise
- Observes max parameters (number of orders, lines, number of pieces)
- Applies filter criteria (shipping address, packing team)
- Complete source documents are included (no splitting)
- Batch completion: When a threshold is reached, batch is completed, additional orders go into new batch
- Batch assignment: Unique MOP batch ID is assigned
- Status: Newly created batches receive status 0-Created
Hinweis
If the min. number of orders is not reached, the batch remains in status 0-Created and must be released manually or discarded.
Execute MOP Batch
Phase 1: Preparation
Create warehouse document:
- Warehouse shipment planning → Select source documents → Create warehouse document
- Quantities are immediately reserved (field "Quantity in Picking")
- Picking team is assigned (only MOP teams)
- Fields remain empty: MOP batch no., consolidation no., picking document no.
Create MOP batch:
- MOP monitor → Create MOP Batches
- Batch status: 0-Created
- Fields still remain empty (are only filled upon release)
Phase 2: Release
Release MOP batch:
- MOP monitor → Select batch (status 0-Created) → Release MOP Batch
- System automatically executes:
- Assign MOP batch no. → Groups lines for A4.1
- Assign consolidation no. → Controls packing together (see Packing together rules)
- Create picking document → Type: MOP-PICKING
- Update quantities → Status: "In Picking"
- Batch status: 1-Released
Hinweis
MOP batch no. vs. consolidation no.:
- MOP batch no.: All lines of the batch have the same number → Are displayed together in A4.1
- Consolidation no.: Different numbers depending on packing together rules → Controls what may be packed together
Important: In contrast to series picking, not everything is packed together, but order-pure into separate containers/compartments.
Phase 3: Picking
Pick on MDE:
- Open A4 Picking
- A4.1: Batch is displayed as one operation (grouped by MOP batch no.)
- A4.2: Positions are displayed (cumulated only within one order)
- A4 MOP PTU LC Assignment: Assign MOP Boxes to orders and PTUs
- A4.3: Pick items - System validates consolidation no. when scanning into container/compartment
- Batch status: 2-In Picking → 3-Picked
For a detailed explanation please read A4 MOP PTU LC Assignment.
Packaging
The packaging process in Business Central is based on three central pages:
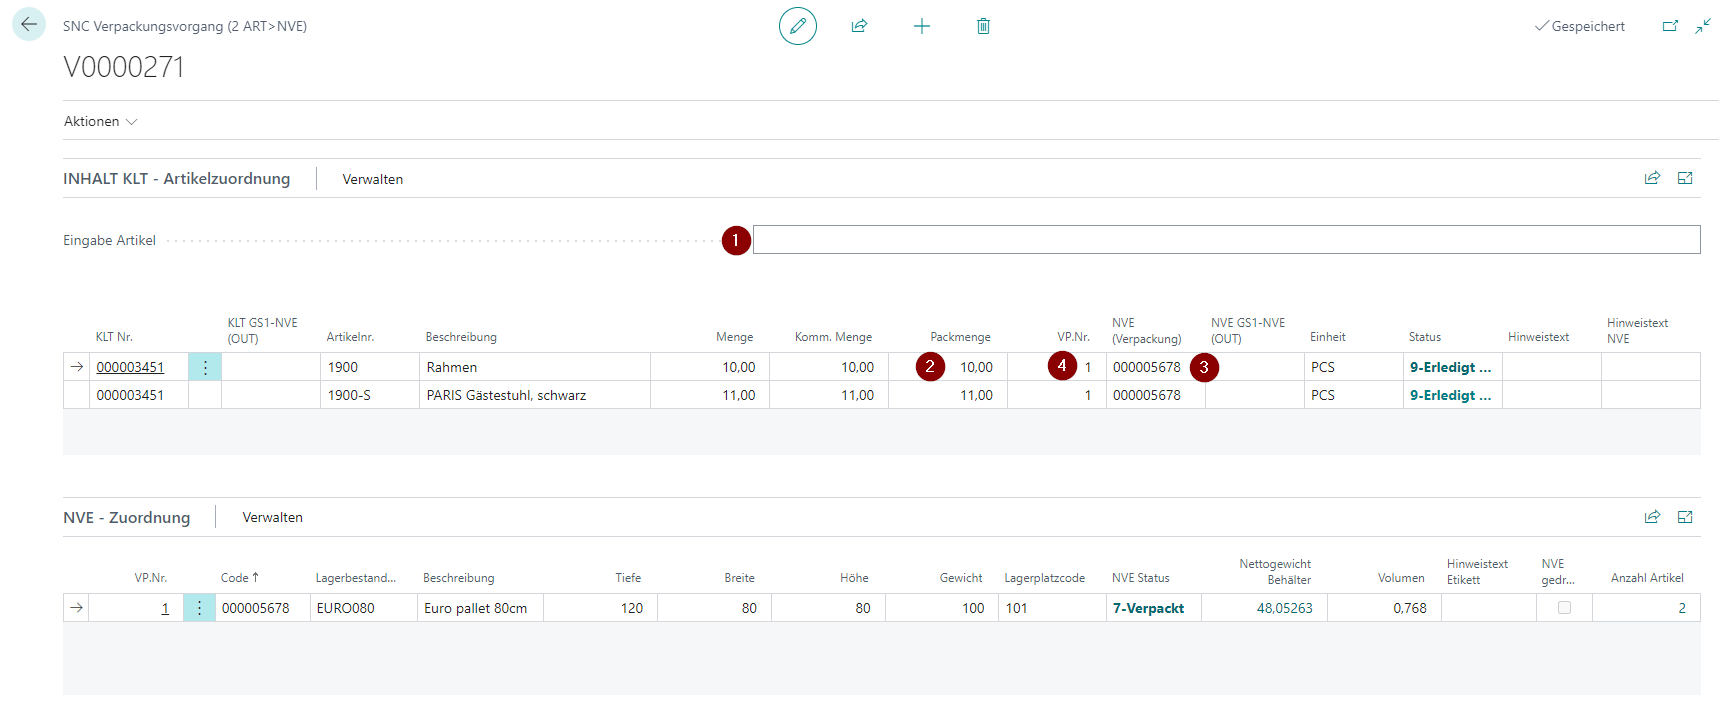
- SNC Packaging Card 1 PTU>SSCC: Starting point and main process
- SNC Packaging Card 2 ART>SSCC: Allows the PTU content to be assigned to SSCCs at item level. In exceptional cases, individual item quantities can also be assigned to a SSCC
- SNC Packaging Card 3 SSCC>PTU: Allows the SSCC contents to be viewed and corrected. For self-checking by the packager
The packaging process bracket is the packaging card information.
Process:
- Normally, a packaging process should have been created automatically by the system as soon as the first PTU was created during picking. Otherwise, create a new packaging process in Warehouse Shipment Planning via Actions -> **New Document -> Create Packaging Process.
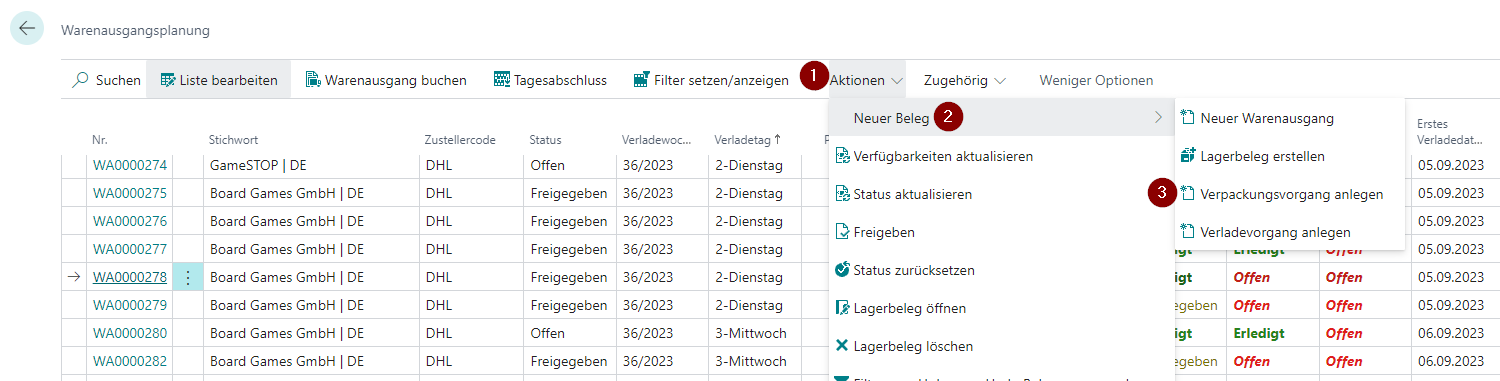
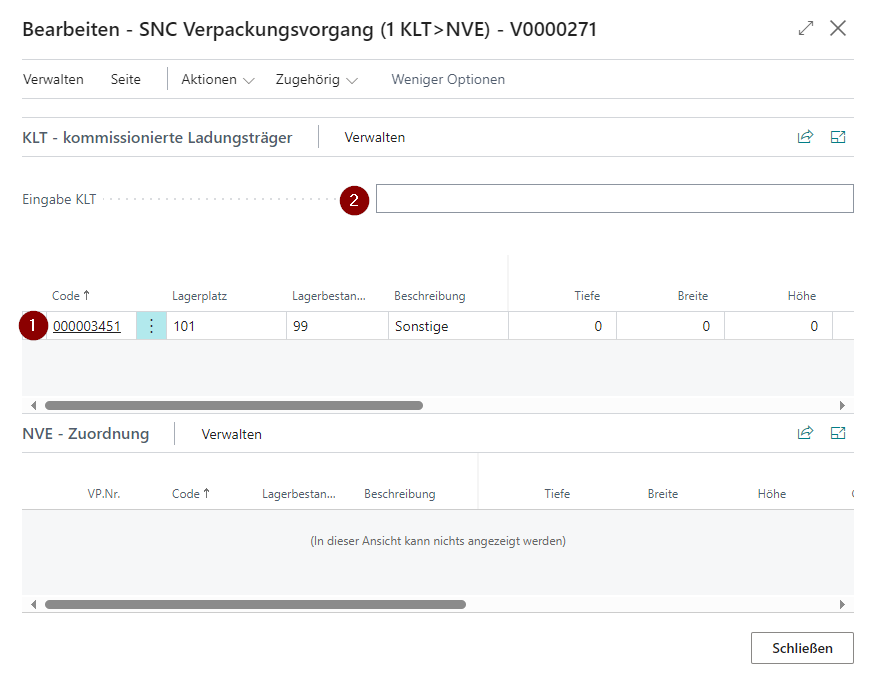
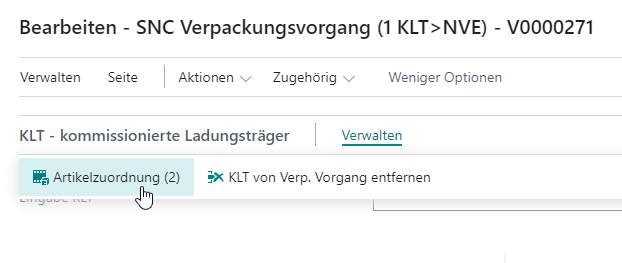
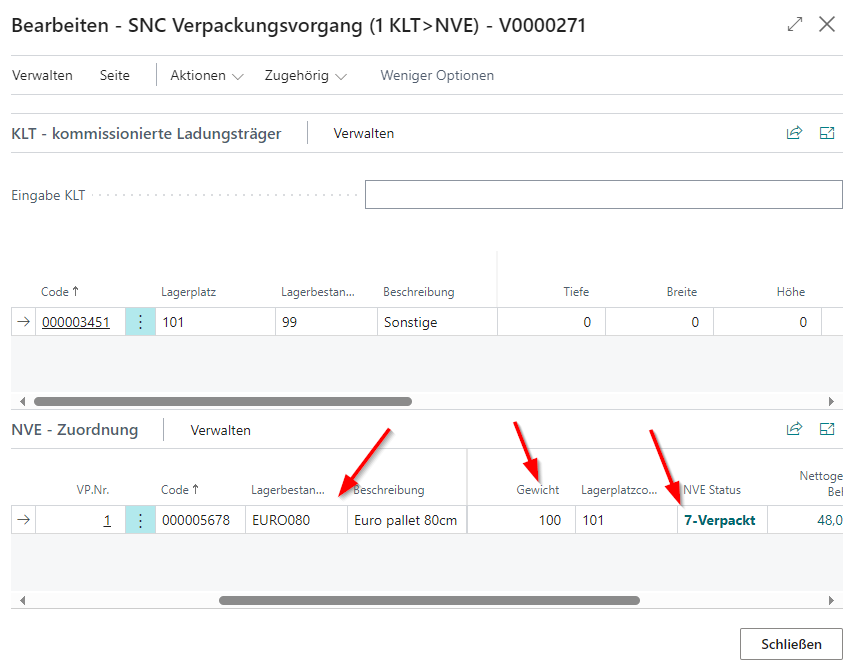
- This action not only creates the packaging process, but also directly opens the page with which the further process is continued: SNC Packaging Card 1 PTU>SSCC. The previously created PTUs (see screenshot below: 1) are automatically assigned to this packaging process. If you did not have to create a new packaging process and have already opened it, switch to SNC Packaging Card 1 PTU>SSCC via Actions -> Show SSCC/SSCC Information.
- Now scan the first PTU barcode in the Scan PTU(2) field. It is not possible to enter the code as the check digit of the barcode is missing here.
- After scanning the barcode, the system will automatically focus on the SSCC (Packaging) field in the respective PTU line. Now pack the item and scan an existing SSCC or a Blanco Barcode.
Hinweis
It is also possible to scan the PTU barcode again. This converts the PTU 1:1 into a SSCC. If you want to undo this, simply remove the VP.no. assignment.
- A new line has now been created in the SSCC - Assignment lines with the state 2-Recorded. This means that the package to be shipped has been created. In the course of this, the PTU State in the top line has been set to 9-Finished. The picked load carrier has therefore completed its progress. If you have activated the Load Carrier option Archive Delivered Load Carriers in the SIEVERS WMS Setup, the load carrier is automatically archived and can be found again via Posted Load Carrier.
- If you want to assign more items to the SSCC or divide the item quantities among several SSCCs, use the Item Assignment. This can be found in the Manage menu of the PTU lines.
- Now weigh the finished SSCC load carrier. Then enter the correct inventory measure and a weight in the SSCC assignment line. As a result, the SSCC state is set to 7-Packaged.
Hinweis
If you remove the dimensions or weight again, the state of the SSCC is reset to 2-Recorded. If you enter the data again, it will automatically change to 7-Packed.
- Repeat steps 3 to 7 to add further PTUs to a SSCC.
- Once a SSCC is completely filled, you can access SNC Packaging Card 3 SSCC>PTU via Manage -> SSCC Content (3) and check your work. The SSCC and its contents are shown here broken down. If you realize that you have packed an item in the wrong SSCC and want to change it, simply enter the correct Packaging No. in the content line.
Hinweis
If you want to remove an item from a SSCC, remove or change the Packaging No. assignment. If the SSCC becomes empty, the system will offer to remove the SSCC.
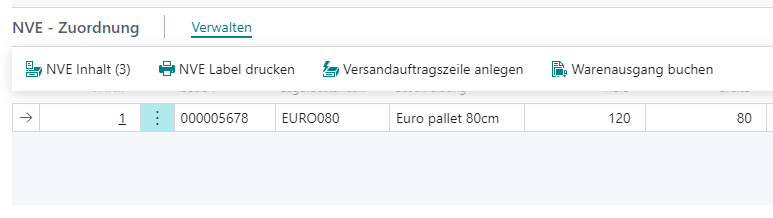
- The SSCC state is now 7-packed, so the SSCC label can now be printed. Depending on whether the package contains more items than specified in the Min. Item Qty. SSCC Pack. Cont. setup field, an additional SSCC Package Content List is printed and must be attached to the package. Select the SSCC and print the label via Manage -> Print SSCC label.
Hinweis
In series distribution, the automatic SSCC label print can be disabled via the setup field Disable autom. SSCC label print in Series Distribution in the SIEVERS WMS Setup. In this case, printing is only done manually via the corresponding action.
- When you are finished, you can either post the warehouse shipment directly via Manage or create the shipping order lines, depending on the Shipping Agent settings.
Item Assignment
On the SNC Packaging Card Item SSCC (2 ITEM>SSCC) page, you can manage the item assignments of the PTUs to SSCCs. You can:
- Freely assign items to any SSCC and
- Split item lines and assign them to different SSCCs
Process:
- Scan the item you want in the Scan Item field
- Enter the pack quantity
- Scan the SSCC into which you want to pack the item in SSCC (Packaging).
- The item line is now assigned the appropriate Packaging No.. If you want to change the assignment, you can adjust it
It is important that you always scan the item before progressing.
Shipping
If a shipping agent who has not deactivated No shipping orders is entered in the warehouse shipment, a shipping order is automatically generated. Shipping orders are part of the SIEVERS Shipping module and are used to generate and manage shipping labels. Please make sure that you have set up SIEVERS Shipping correctly.
- Access the list of assigned shipping orders via Factbox in Warehouse Shipment Planning by clicking on the Number of Shipping Orders and select the shipping order.
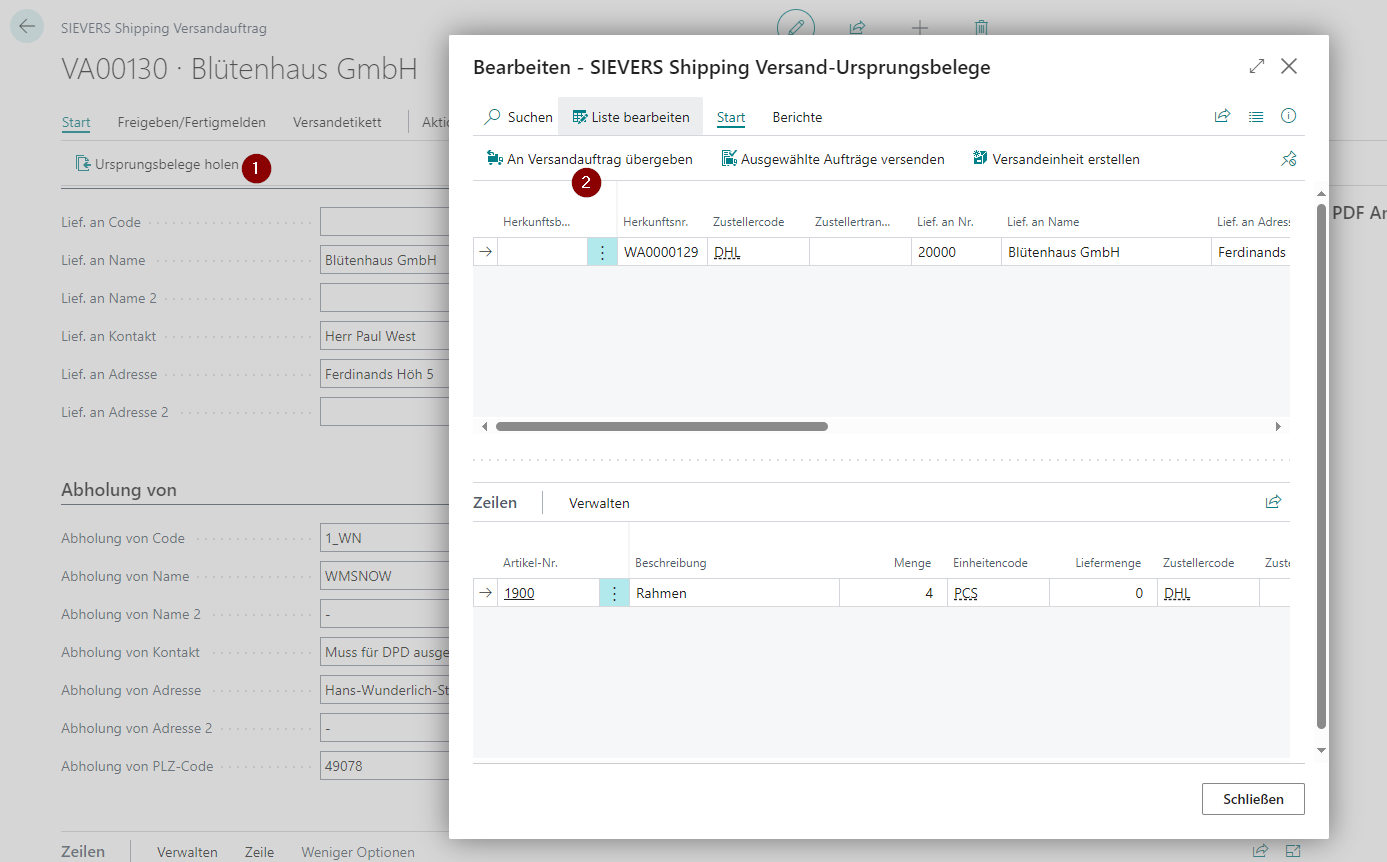
Ideally, the shipping order lines should have been generated automatically during picking or packaging as soon as the Load Carriers are of type SSCC and state 7-Packed. If this is not the case, you can also generate the shipping order lines manually. Please read the next step. Otherwise you can continue with step 4.
Via Home -> Get Source Documents you can now assign the existing SSCCs of the warehouse shipment to the shipping order. To do this, click on Transfer to Shipping Order in the mask. If you have already carried out the Create shipping order line action for all Load Carriers during picking or packaging, this step is no longer necessary.
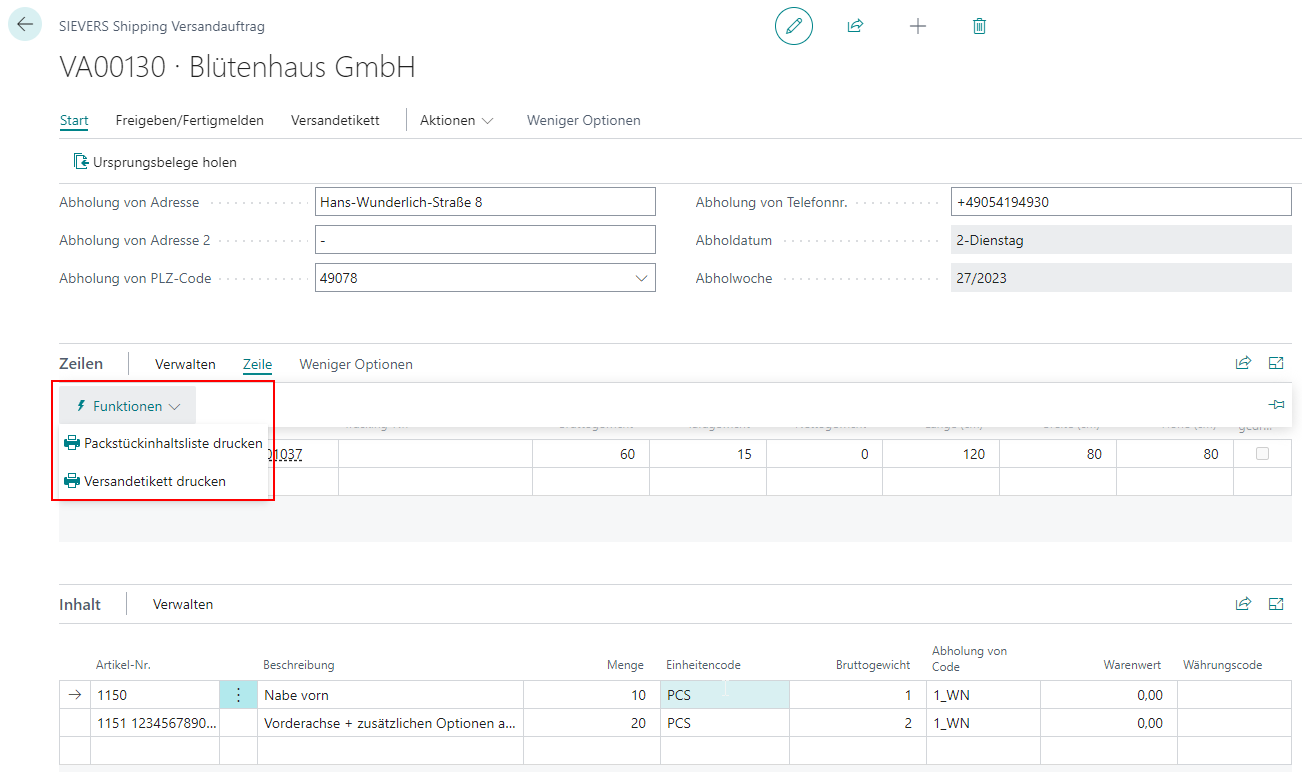
- You can now print package content lists or shipping labels for the individual lines via Line -> Functions.
- When you are finished, finish the document so that the warehouse shipment can be released and posted. The shipping order now becomes an archived shipping order, which can be viewed in the corresponding list Shipping Order Archive List.
Loading
If the [shipping agent](#shipping agent) has activated the loading required flag, a loading process must be created for a warehouse shipment.
- To do this, create a new shipment process via Actions -> New document in Warehouse Shipment Planning. Enter the number of shipment processes you want to create in the Number of Processes field (1). Then click on the three dots to go to Create (2). When you are finished, you can click on OK and a table will be shown with the shipment processes that have been created. These initially have the state 0-created.
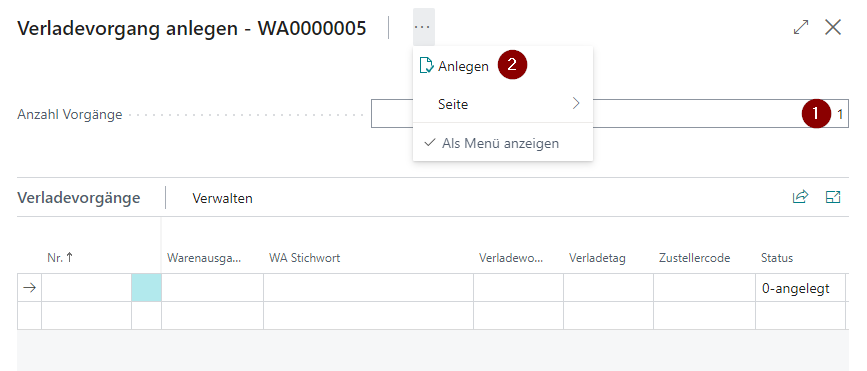
Hinweis
You can create as many shipment processes as you like for a warehouse shipment. If a load carrier is assigned to the process in the shipment process lines and thus marked as loaded, it automatically disappears from the other shipment processes. This prevents inconsistent data.
- Now open one of the shipment processes. The General area has been pre-filled with data from the warehouse shipment. In addition, the Logistics Team, the Loader and the Loading Storage Place are filled with data from the shipping agent. You can now fill in Planned on and Planned at.
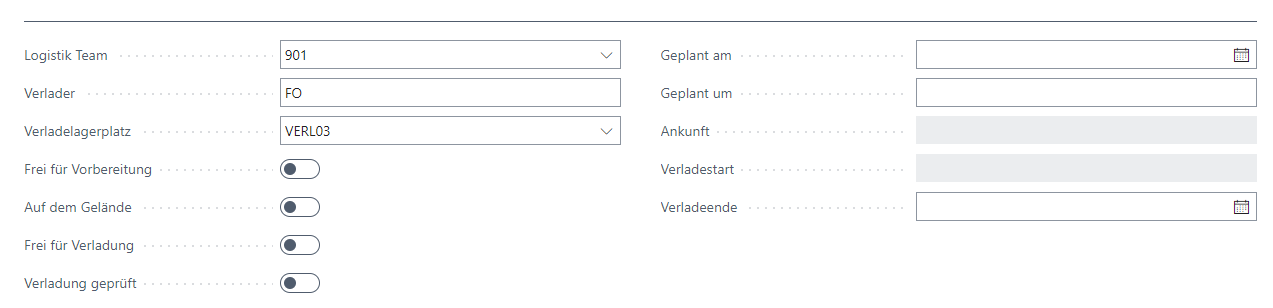
- When the transport vehicle has arrived, the check mark is set at Arrived on yard. This specifies the arrival time.
- Since some time elapses between the arrival of the vehicle and the actual start of loading, the start of loading is only set when the license plate Released for loading is activated. The prerequisite for this is that at least one load carrier with the state 7-Packed is in the loading process.
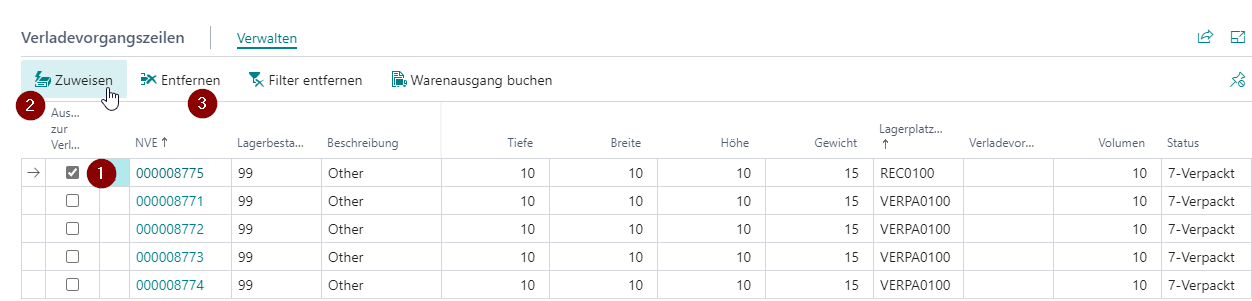
- Now the loading is carried out. To do this, click on the Confirm for Shipment Process (1) check box in the shipment process lines for the loaded load carriers and then on Assign (2). The checked load carriers have now been assigned to this shipment process and the state has been set to 8-loading.
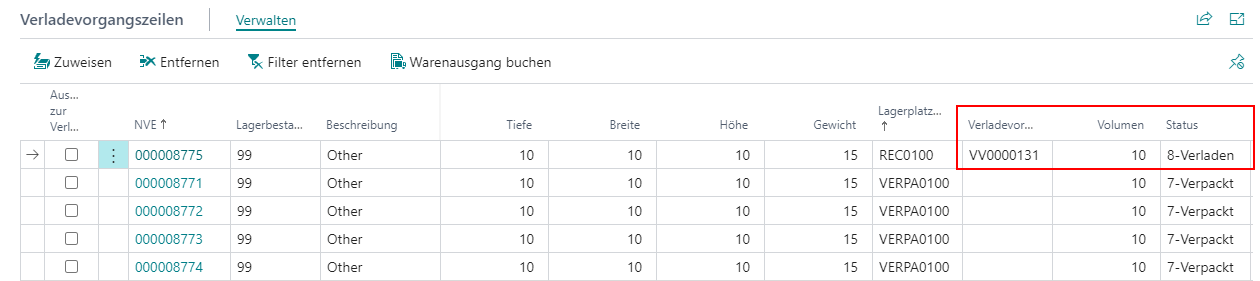
If you now close this shipment process and reopen it or switch to another shipment process belonging to this warehouse shipment, you will notice that the load carrier you have just assigned is no longer shown in the shipment process lines. This is because it is no longer relevant for loading and has been filtered out. This also prevents the same load carrier from being accidentally assigned to different shipment processes. If you want to see the SSCCs that have already been loaded, you can Remove filter.
Once loading has been completed and checked, the Loading checked indicator is set. This also marks the end of loading. In this step, you can also immediately post the warehouse shipment.
Hinweis
Reusable load carriers are automatically reset after the warehouse shipment posting. If the Chg. Load Carrier Type allowed flag is set, the load carrier type is changed to SU, the status is reset, and the order assignment is removed. The load carrier is then available again for new warehouse processes. If a Default Storage Place for Reusable LC is stored in the SIEVERS WMS Setup, the load carrier is automatically posted to this storage place. The load carrier is then available again for new warehouse processes.