B4 Warehouse Receipt Unloading
A warehouse receipt unloading process can be created and executed using these pages. This area is explicitly intended for employees who focus exclusively on unloading warehouse receipts. For this purpose, there are only the following pages in B4
- B4.1 Rec. Overview and
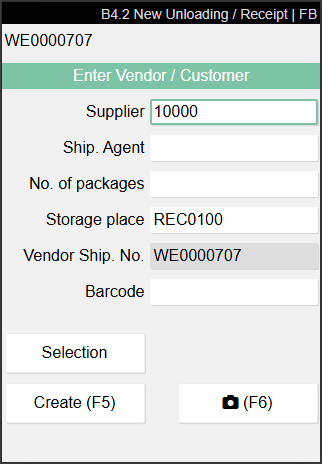
- B4.2 New Unloading/ Receipt
The pages corresponds exactly to A1.1 and A1.0. Scanning a warehouse receipt, load carrier or item in B4.1 starts the unloading process. Alternatively, you can also create a new process via menu A1. If possible, the supplier or shipping agent is already pre-filled so that only
- No of packages
- Storage place and
- Barcode
have to be filled in by the user. Otherwise, you can also manually select a supplier in B4.2 using Selection. If necessary, add photos to the warehouse receipt via F6 and create it with F5.

- Scan field
- Notes and feedback
- Left: Vendor name from the warehouse receipt | Right: Expected arrival
- Left: Warehouse receipt no. | Center: An i indicates that comment text has been stored. Access with F3 | Right: State of the warehouse receipt and employee marking
- Left: Unloading place | Center: Shipping agent | Right: Number of load carriers
- Left: Number of source documents | Center: Number of load carriers | Right: Number of items
Process:
- Select a warehouse receipt from the overview, scan a load carrier or item, or start an empty process from the menu (item 1). This sets the arrival time of the warehouse receipt.
- Fill in the fields in B4.2 New Unloading beginning with the No. of packages. Also scan a load carrier or a blanko barcode in the barcode field.
- If required, add photos using F6. These are attached to the warehouse receipt.
- Create the unloading process using F5. This populates the departure time of the warehouse receipt and sets the state to 1-Recorded.